Set up a New Company
Now first of all we are going to tell you how to set up a new company using Peachtree accounting. By double clicking on the software you will get the following page.
When the above page will be open, click on 2nd option “Set up a new Company”. After clicking on that you will get the following page before you.
This page is the wizard for introducing your company in the given heads. If you will click on the 1st head then you will get the following page before you.
After filling the above form with the relevant information you will get the page like following.
The chart of Accounts is the list of General ledger accounts. If you want to see the charts of Accounts of your company then click on 2nd head of the “Set up of new company” heading. After clicking you will get the following page before you.
When the above page will be displayed then you can select from the given five options. The first option means that if you are setting up a Retail business, Service business, Construction business, Manufacturing business, or a distribution company then by clicking on that you may get the simplified chart of accounts that these businesses usually use.
If you will click on 1st option then you will get the following page before you.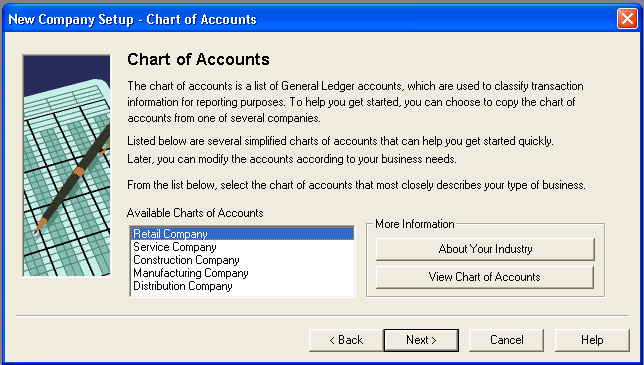
You can see “View Chart of Accounts” on the above page. If you will click on it then you will get following simplified chart of accounts of Retail Company as you selected in blue color.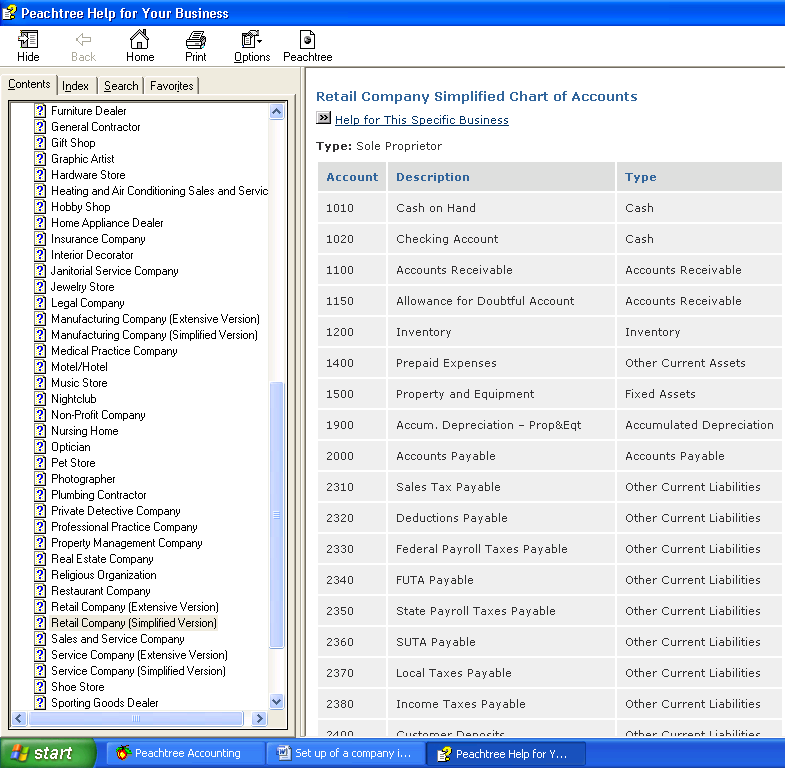
From the above page if you will drag mouse downward then you will get the following chart of accounts of Retail Company.
Account
|
Description
|
Type
|
| 1010 | Cash on Hand | Cash |
| 1020 | Checking Account | Cash |
| 1100 | Accounts Receivable | Accounts Receivable |
| 1150 | Allowance for Doubtful Account | Accounts Receivable |
| 1200 | Inventory | Inventory |
| 1400 | Prepaid Expenses | Other Current Assets |
| 1500 | Property and Equipment | Fixed Assets |
| 1900 | Accum. Depreciation – Prop&Eqt | Accumulated Depreciation |
| 2000 | Accounts Payable | Accounts Payable |
| 2310 | Sales Tax Payable | Other Current Liabilities |
| 2320 | Deductions Payable | Other Current Liabilities |
| 2330 | Federal Payroll Taxes Payable | Other Current Liabilities |
| 2340 | FUTA Payable | Other Current Liabilities |
| 2350 | State Payroll Taxes Payable | Other Current Liabilities |
| 2360 | SUTA Payable | Other Current Liabilities |
| 2370 | Local Taxes Payable | Other Current Liabilities |
| 2380 | Income Taxes Payable | Other Current Liabilities |
| 2400 | Customer Deposits | Other Current Liabilities |
| 2500 | Current Portion Long-Term Debt | Other Current Liabilities |
| 2700 | Long Term Debt – Noncurrent | Long Term Liabilities |
| 4000 | Sales Income | Income |
| 4100 | Interest Income | Income |
| 4200 | Finance Charge Income | Income |
| 4300 | Other Income | Income |
| 4900 | Sales Discounts | Income |
| 5000 | Cost of Sales | Cost of Sales |
| 5100 | Cost of Sales - Freight | Cost of Sales |
| 5400 | Cost of Sales - Salary & Wage | Cost of Sales |
| 5900 | Inventory Adjustments | Cost of Sales |
| 6000 | Wages Expense | Expense |
| 6050 | Employee Benefit Programs Expense | Expense |
| 6100 | Payroll Tax Expense | Expense |
| 6150 | Bad Debt Expense | Expense |
| 6200 | Income Tax Expense | Expense |
| 6250 | Other Taxes Expense | Expense |
| 6300 | Rent or Lease Expense | Expense |
| 6350 | Maintenance & Repairs Expense | Expense |
| 6400 | Utilities Expense | Expense |
| 6450 | Office Supplies Expense | Expense |
| 6500 | Telephone Expense | Expense |
| 6550 | Other Office Expense | Expense |
| 6600 | Advertising Expense | Expense |
| 6650 | Commissions and Fees Expense | Expense |
| 6700 | Franchise Fees Expense | Expense |
| 6750 | Equipment Rental Expense | Expense |
| 6800 | Freight Expense | Expense |
| 6850 | Service Charge Expense | Expense |
| 6900 | Purchase Disc-Expense Items | Expense |
| 6950 | Insurance Expense | Expense |
| 7000 | Over and Short Expense | Expense |
| 7050 | Depreciation Expense | Expense |
| 7100 | Gain/Loss - Sale of Assets Exp | Expense |
If you want to see simplified chart of accounts of a Service company then click on it to select as shown below.
You can see in blue color that you selected Service Company. And then if you will click on “View Chart of Accounts” then you will get the following page before you.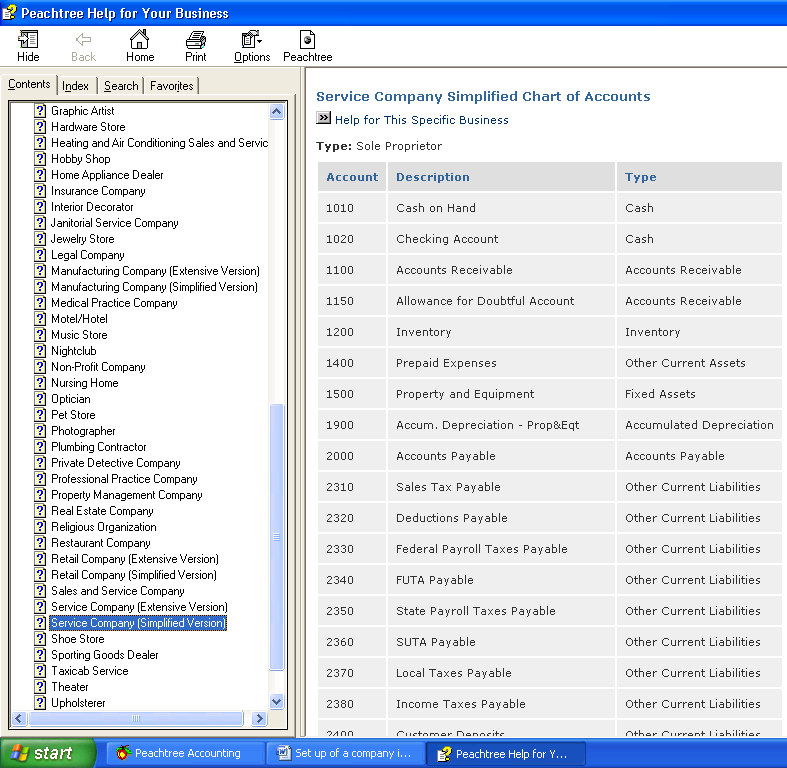
If you will drag the mouse downward then you will get following simplified chart of Accounts for a Service Company.
Account
|
Description
|
Type
|
| 1010 | Cash on Hand | Cash |
| 1020 | Checking Account | Cash |
| 1100 | Accounts Receivable | Accounts Receivable |
| 1150 | Allowance for Doubtful Account | Accounts Receivable |
| 1200 | Inventory | Inventory |
| 1400 | Prepaid Expenses | Other Current Assets |
| 1500 | Property and Equipment | Fixed Assets |
| 1900 | Accum. Depreciation - Prop&Eqt | Accumulated Depreciation |
| 2000 | Accounts Payable | Accounts Payable |
| 2310 | Sales Tax Payable | Other Current Liabilities |
| 2320 | Deductions Payable | Other Current Liabilities |
| 2330 | Federal Payroll Taxes Payable | Other Current Liabilities |
| 2340 | FUTA Payable | Other Current Liabilities |
| 2350 | State Payroll Taxes Payable | Other Current Liabilities |
| 2360 | SUTA Payable | Other Current Liabilities |
| 2370 | Local Taxes Payable | Other Current Liabilities |
| 2380 | Income Taxes Payable | Other Current Liabilities |
| 2400 | Customer Deposits | Other Current Liabilities |
| 2500 | Current Portion Long-Term Debt | Other Current Liabilities |
| 2700 | Long-Term Debt - Noncurrent | Long Term Liabilities |
| 4000 | Professional Fees | Income |
| 4050 | Sales of Materials | Income |
| 4100 | Interest Income | Income |
| 4200 | Finance Charge Income | Income |
| 4300 | Other Income | Income |
| 4900 | Sales/Fee Discounts | Income |
| 5000 | Cost of Sales | Cost of Sales |
| 5400 | Cost of Sales - Salary & Wage | Cost of Sales |
| 5900 | Inventory Adjustments | Cost of Sales |
| 6000 | Wages Expense | Expense |
| 6050 | Employee Benefit Programs Expense | Expense |
| 6100 | Payroll Tax Expense | Expense |
| 6150 | Bad Debt Expense | Expense |
| 6200 | Income Tax Expense | Expense |
| 6250 | Other Taxes Expense | Expense |
| 6300 | Rent or Lease Expense | Expense |
| 6350 | Maintenance & Repairs Expense | Expense |
| 6400 | Utilities Expense | Expense |
| 6450 | Office Supplies Expense | Expense |
| 6500 | Telephone Expense | Expense |
| 6550 | Other Office Expense | Expense |
| 6600 | Advertising Expense | Expense |
| 6650 | Commissions and Fees Expense | Expense |
| 6800 | Freight Expense | Expense |
| 6850 | Service Charge Expense | Expense |
| 6900 | Purchase Disc - Expense Items | Expense |
| 6950 | Insurance Expense | Expense |
| 7050 | Depreciation Expense | Expense |
| 7100 | Gain/Loss - Sale of Assets Exp | Expense |
If you want to see simplified chart of accounts of a construction company then click on it to select as shown below.
You can see in blue color that you selected Construction Company. And then if you will click on “View Chart of Accounts” then you will get the following page before you.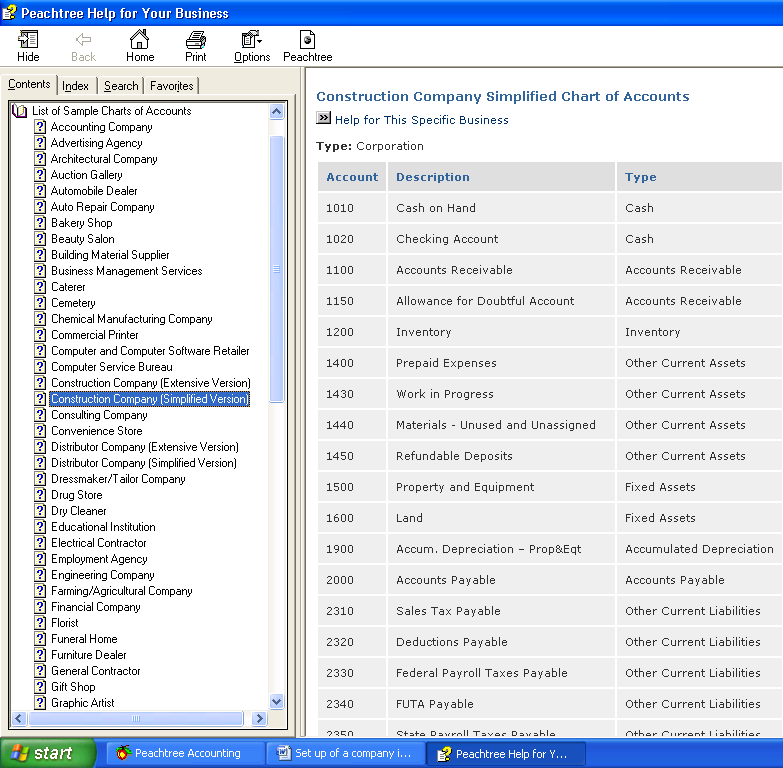
If you will drag the mouse downward then you will get following simplified chart of Accounts for a Construction Company.
Account
|
Description
|
Type
|
| 1010 | Cash on Hand | Cash |
| 1020 | Checking Account | Cash |
| 1100 | Accounts Receivable | Accounts Receivable |
| 1150 | Allowance for Doubtful Account | Accounts Receivable |
| 1200 | Inventory | Inventory |
| 1400 | Prepaid Expenses | Other Current Assets |
| 1430 | Work in Progress | Other Current Assets |
| 1440 | Materials - Unused and Unassigned | Other Current Assets |
| 1450 | Refundable Deposits | Other Current Assets |
| 1500 | Property and Equipment | Fixed Assets |
| 1600 | Land | Fixed Assets |
| 1900 | Accum. Depreciation – Prop&Eqt | Accumulated Depreciation |
| 2000 | Accounts Payable | Accounts Payable |
| 2310 | Sales Tax Payable | Other Current Liabilities |
| 2320 | Deductions Payable | Other Current Liabilities |
| 2330 | Federal Payroll Taxes Payable | Other Current Liabilities |
| 2340 | FUTA Payable | Other Current Liabilities |
| 2350 | State Payroll Taxes Payable | Other Current Liabilities |
| 2360 | SUTA Payable | Other Current Liabilities |
| 2370 | Local Taxes Payable | Other Current Liabilities |
| 2380 | Income Taxes Payable | Other Current Liabilities |
| 2400 | Customer Deposits | Other Current Liabilities |
| 2500 | Current Portion Long-Term Debt | Other Current Liabilities |
| 2700 | Long Term Debt – Noncurrent | Long Term Liabilities |
| 4000 | Sales | Income |
| 4100 | Interest Income | Income |
| 4200 | Other Income | Income |
| 4900 | Sales Discounts | Income |
| 5000 | Labor Costs | Cost of Sales |
| 5100 | Materials Costs | Cost of Sales |
| 5200 | Equipment Costs | Cost of Sales |
| 5300 | Subcontract Costs | Cost of Sales |
| 5400 | Cost of Sales - Salary & Wage | Cost of Sales |
| 5900 | Inventory Adjustments | Cost of Sales |
| 6000 | Wages Expense | Expense |
| 6050 | Employee Benefit Programs Expense | Expense |
| 6100 | Payroll Tax Expense | Expense |
| 6150 | Bad Debt Expense | Expense |
| 6200 | Income Tax Expense | Expense |
| 6250 | Other Taxes Expense | Expense |
| 6300 | Rent or Lease Expense | Expense |
| 6350 | Maintenance & Repairs Expense | Expense |
| 6750 | Licenses and Permits Expense | Expense |
| 6950 | Postage and Freight Expense | Expense |
| 7000 | Travel Expense | Expense |
| 7050 | Office Supplies Expense | Expense |
| 7100 | Telephone Expense | Expense |
| 7150 | Utilities Expense | Expense |
| 7200 | Service Charge Expense | Expense |
| 7250 | Purchase Disc-Expense Items | Expense |
| 7300 | Insurance Expense | Expense |
| 7350 | Depreciation Expense | Expense |
| 7400 | Gain/Loss - Sale of Assets Exp | Expense |
If you want to see simplified chart of accounts of a Manufacturing company then click on it as shown below.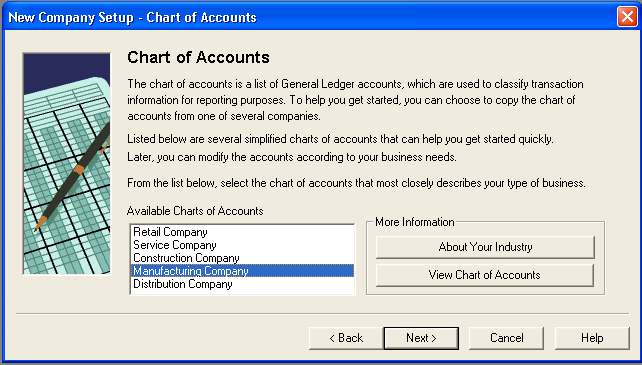
You can see in blue color that you selected Manufacturing Company. And then if you will click on “View Chart of Accounts” then you will get the following page before you.
If you will drag the mouse downward then you will get following simplified chart of Accounts for a Manufacturing Company.
Account
|
Description
|
Type
|
| 1010 | Cash on Hand | Cash |
| 1020 | Checking Account | Cash |
| 1100 | Accounts Receivable | Accounts Receivable |
| 1150 | Allowance for Doubtful Accounts | Accounts Receivable |
| 1200 | Raw Materials Inventory | Inventory |
| 1250 | Work in Progress Inventory | Inventory |
| 1300 | Finished Goods Inventory | Inventory |
| 1400 | Prepaid Expenses | Other Current Assets |
| 1500 | Plant Property and Equipment | Fixed Assets |
| 1900 | Accum. Depreciation – Prop&Eqt | Accumulated Depreciation |
| 2000 | Accounts Payable | Accounts Payable |
| 2310 | Sales Tax Payable | Other Current Liabilities |
| 2320 | Deductions Payable | Other Current Liabilities |
| 2330 | Federal Payroll Taxes Payable | Other Current Liabilities |
| 2340 | FUTA Payable | Other Current Liabilities |
| 2350 | State Payroll Taxes Payable | Other Current Liabilities |
| 2360 | SUTA Payable | Other Current Liabilities |
| 2370 | Local Taxes Payable | Other Current Liabilities |
| 2380 | Income Taxes Payable | Other Current Liabilities |
| 2400 | Customer Deposits | Other Current Liabilities |
| 2500 | Current Portion Long-Term Debt | Other Current Liabilities |
| 2700 | Long Term Debt – Noncurrent | Long Term Liabilities |
| 4000 | Sales Income | Income |
| 4100 | Interest Income | Income |
| 4200 | Other Income | Income |
| 4900 | Sales Discounts | Income |
| 5000 | Raw Materials Costs | Cost of Sales |
| 5100 | Direct Labor | Cost of Sales |
| 5200 | Indirect Labor | Cost of Sales |
| 5300 | Cost of Sales - Freight | Cost of Sales |
| 5400 | Cost of Sales - Salary & Wage | Cost of Sales |
| 5900 | Inventory Adjustments | Cost of Sales |
| 6000 | Wages Expense | Expense |
| 6050 | Employee Benefit Programs Expense | Expense |
| 6100 | Payroll Tax Expense | Expense |
| 6150 | Bad Debt Expense | Expense |
| 6200 | Income Tax Expense | Expense |
| 6250 | Other Taxes Expense | Expense |
| 6300 | Rent or Lease Expense | Expense |
| 6350 | Maintenance & Repairs Expense | Expense |
| 6400 | Utilities Expense | Expense |
| 6450 | Telephone Expense | Expense |
| 6500 | Office Supplies Expense | Expense |
| 6550 | Other Office Expense | Expense |
| 6600 | Freight Expense | Expense |
| 6650 | Service Charge Expense | Expense |
| 6700 | Purchase Disc-Expense Items | Expense |
| 6750 | Insurance Expense | Expense |
| 6800 | Depreciation Expense | Expense |
| 6850 | Gain/Loss - Sale of Assets Exp | Expense |
If you want to see simplified chart of accounts of a Distribution company then click on it to select as shown below.
You can see in blue color that you selected Distribution Company. And then if you will click on “View Chart of Accounts” then you will get the following page before you.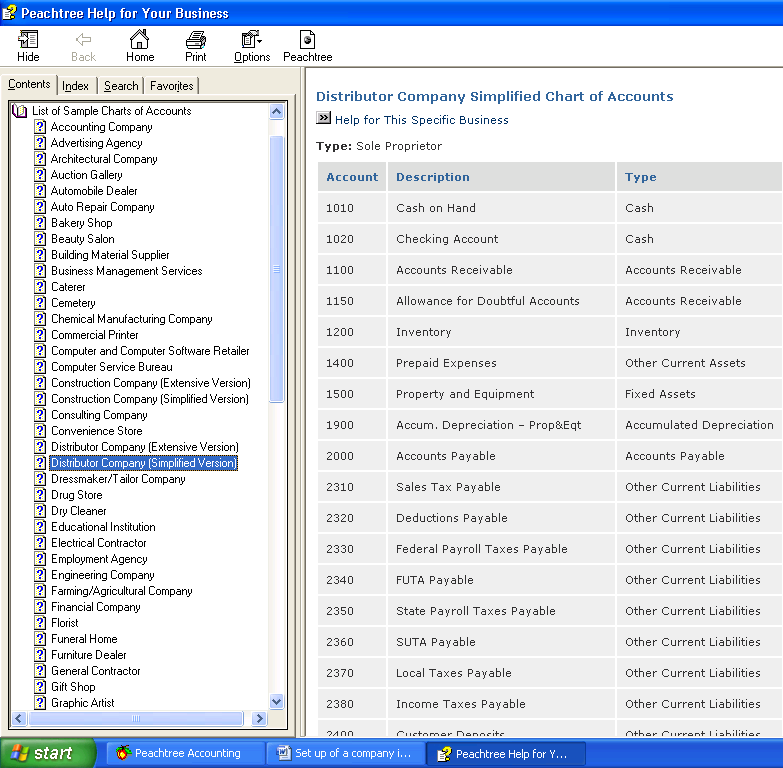
If you will drag the mouse downward then you will get following simplified chart of Accounts for a Distribution Company.
Account
|
Description
|
Type
|
| 1010 | Cash on Hand | Cash |
| 1020 | Checking Account | Cash |
| 1100 | Accounts Receivable | Accounts Receivable |
| 1150 | Allowance for Doubtful Accounts | Accounts Receivable |
| 1200 | Inventory | Inventory |
| 1400 | Prepaid Expenses | Other Current Assets |
| 1500 | Property and Equipment | Fixed Assets |
| 1900 | Accum. Depreciation – Prop&Eqt | Accumulated Depreciation |
| 2000 | Accounts Payable | Accounts Payable |
| 2310 | Sales Tax Payable | Other Current Liabilities |
| 2320 | Deductions Payable | Other Current Liabilities |
| 2330 | Federal Payroll Taxes Payable | Other Current Liabilities |
| 2340 | FUTA Payable | Other Current Liabilities |
| 2350 | State Payroll Taxes Payable | Other Current Liabilities |
| 2360 | SUTA Payable | Other Current Liabilities |
| 2370 | Local Taxes Payable | Other Current Liabilities |
| 2380 | Income Taxes Payable | Other Current Liabilities |
| 2400 | Customer Deposits | Other Current Liabilities |
| 2500 | Current Portion Long-Term Debt | Other Current Liabilities |
| 2700 | Long Term Debt – Noncurrent | Long Term Liabilities |
| 4000 | Sales Income | Income |
| 4100 | Interest Income | Income |
| 4200 | Other Income | Income |
| 4900 | Sales Discounts | Income |
| 5000 | Cost of Sales | Cost of Sales |
| 5400 | Cost of Sales - Salary & Wage | Cost of Sales |
| 5900 | Inventory Adjustments | Cost of Sales |
| 6000 | Wages Expense | Expense |
| 6050 | Employee Benefit Programs Expense | Expense |
| 6100 | Payroll Tax Expense | Expense |
| 6150 | Bad Debt Expense | Expense |
| 6200 | Income Tax Expense | Expense |
| 6250 | Other Taxes Expense | Expense |
| 6300 | Rent or Lease Expense | Expense |
| 6350 | Maintenance & Repairs Expense | Expense |
| 6400 | Utilities Expense | Expense |
| 6450 | Office Supplies Expense | Expense |
| 6500 | Telephone Expense | Expense |
| 6550 | Other Office Expense | Expense |
| 6600 | Delivery Expense | Expense |
| 6650 | Postage and Freight Expense | Expense |
| 6700 | Travel Expense | Expense |
| 6750 | Service Charge Expense | Expense |
| 6800 | Purchase Disc-Expense Items | Expense |
| 6850 | Insurance Expense | Expense |
| 6900 | Depreciation Expense | Expense |
| 6950 | Gain/Loss - Sale of Assets Exp | Expense |
The Second option means that if you want to get extensive chart of accounts of one of the many sample companies then click on 2nd option as below.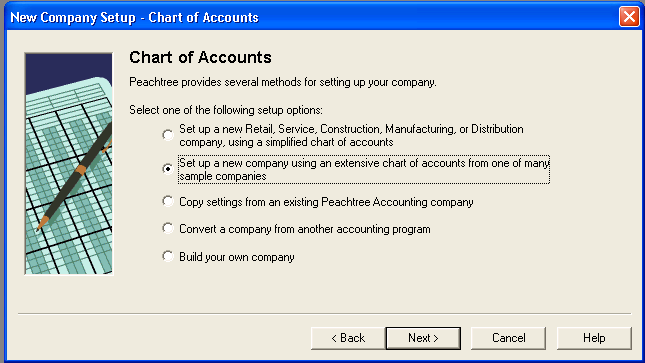
If you will then click the next button the following page will be displayed.
In the same way as discussed earlier you may select any of one company and then click on “View Chart of Accounts” to see the available chart of accounts of that selected company.
But here as we are a manufacturing company therefore we are just showing you the available chart of accounts of Chemical Manufacturing Company.
Then we will select our chemical manufacturing company from the options as below.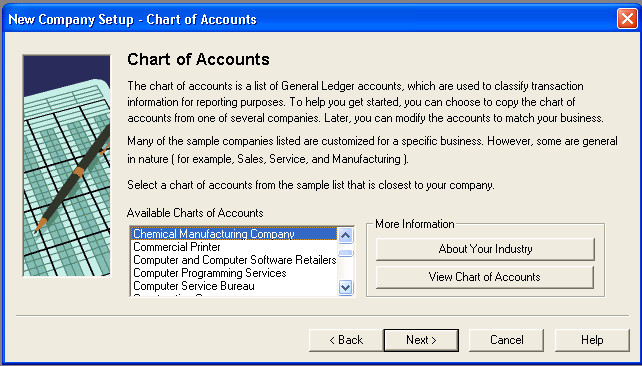
After Selecting “Chemical Manufacturing Company” click on “View Chart of Accounts” to see the available chart of accounts of chemical manufacturing company. After clicking you will get the following page before you.
If you will drag the mouse downward then you will get following available chart of Accounts for a Chemical Manufacturing Company.
Account
|
Description
|
Type
|
| 10000 | Petty Cash | Cash |
| 10100 | Cash on Hand | Cash |
| 10200 | Regular Checking Account | Cash |
| 10300 | Payroll Checking Account | Cash |
| 10400 | Savings Account | Cash |
| 10500 | Special Account | Cash |
| 11000 | Accounts Receivable | Accounts Receivable |
| 11400 | Other Receivables | Accounts Receivable |
| 11500 | Allowance for Doubtful Account | Accounts Receivable |
| 12000 | Raw Material Inventory | Inventory |
| 12050 | Work in Process Inventory | Inventory |
| 12100 | Finished Goods Inventory | Inventory |
| 14000 | Prepaid Expenses | Other Current Assets |
| 14100 | Employee Advances | Other Current Assets |
| 14200 | Notes Receivable-Current | Other Current Assets |
| 14700 | Other Current Assets | Other Current Assets |
| 15000 | Furniture and Fixtures | Fixed Assets |
| 15100 | Equipment | Fixed Assets |
| 15200 | Automobiles | Fixed Assets |
| 15300 | Other Depreciable Property | Fixed Assets |
| 15400 | Leasehold Improvements | Fixed Assets |
| 15500 | Building | Fixed Assets |
| 15600 | Building Improvements | Fixed Assets |
| 16900 | Land | Fixed Assets |
| 17000 | Accum. Depreciation - Furniture | Accumulated Depreciation |
| 17100 | Accum. Depreciation - Equipment | Accumulated Depreciation |
| 17200 | Accum. Depreciation - Automobil | Accumulated Depreciation |
| 17300 | Accum. Depreciation - Other | Accumulated Depreciation |
| 17400 | Accum. Depreciation - Leasehold | Accumulated Depreciation |
| 17500 | Accum. Depreciation - Building | Accumulated Depreciation |
| 17600 | Accum. Depreciation - Bldg Imp | Accumulated Depreciation |
| 19000 | Deposits | Other Assets |
| 19100 | Organization Costs | Other Assets |
| 19150 | Accum. Amortiz. - Org. Costs | Other Assets |
| 19200 | Note Receivable-Noncurrent | Other Assets |
| 19900 | Other Noncurrent Assets | Other Assets |
| 20000 | Accounts Payable | Accounts Payable |
| 23000 | Accrued Expenses | Other Current Liabilities |
| 23100 | Sales Tax Payable | Other Current Liabilities |
| 23200 | Wages Payable | Other Current Liabilities |
| 23300 | Deductions Payable | Other Current Liabilities |
| 23400 | Federal Payroll Taxes Payable | Other Current Liabilities |
| 23500 | FUTA Tax Payable | Other Current Liabilities |
| 23600 | State Payroll Taxes Payable | Other Current Liabilities |
| 23700 | SUTA Payable | Other Current Liabilities |
| 23800 | Local Payroll Taxes Payable | Other Current Liabilities |
| 23900 | Income Taxes Payable | Other Current Liabilities |
| 24000 | Other Taxes Payable | Other Current Liabilities |
| 24100 | Employee Benefits Payable | Other Current Liabilities |
| 24200 | Current Portion Long-Term Debt | Other Current Liabilities |
| 24400 | Customer Deposits | Other Current Liabilities |
| 24800 | Other Current Liabilities | Other Current Liabilities |
| 24900 | Suspense-Clearing Account | Other Current Liabilities |
| 27000 | Notes Payable-Noncurrent | Long Term Liabilities |
| 27100 | Deferred Revenue | Long Term Liabilities |
| 27400 | Other Long-Term Liabilities | Long Term Liabilities |
| 40000 | Sales-Nontaxable | Income |
| 40200 | Sales-Taxable | Income |
| 40400 | Returned Sales-Nontaxable | Income |
| 40600 | Returned Sales-Taxable | Income |
| 40800 | Interest Income | Income |
| 41000 | Other Income | Income |
| 45400 | Finance Charge Income | Income |
| 45500 | Shipping Charges Reimbursed | Income |
| 48000 | Sales Returns and Allowances | Income |
| 49000 | Sales Discounts | Income |
| 50000 | Cost of Materials | Cost of Sales |
| 50500 | Manufacturing Overhead | Cost of Sales |
| 51000 | Variance Account | Cost of Sales |
| 57000 | Cost of Sales-Salaries and Wages | Cost of Sales |
| 57500 | Cost of Sales-Freight | Cost of Sales |
| 58000 | Cost of Sales-Other | Cost of Sales |
| 58500 | Inventory Adjustments | Cost of Sales |
| 59000 | Purchase Returns and Allowance | Cost of Sales |
| 59500 | Purchase Discounts | Cost of Sales |
| 60000 | Default Purchase Expense | Expenses |
| 60100 | Advertising Expense | Expenses |
| 60500 | Amortization Expense | Expenses |
| 61000 | Auto Expenses | Expenses |
| 61500 | Bad Debt Expense | Expenses |
| 62000 | Bank Charges | Expenses |
| 62500 | Cash Over and Short | Expenses |
| 63000 | Charitable Contributions Exp | Expenses |
| 63500 | Commissions and Fees Exp | Expenses |
| 64000 | Depreciation Expense | Expenses |
| 64500 | Dues and Subscriptions Exp | Expenses |
| 65000 | Employee Benefit Programs Exp | Expenses |
| 65500 | Freight Expense | Expenses |
| 66000 | Gifts Expense | Expenses |
| 66500 | Income Tax Expense | Expenses |
| 67000 | Insurance Expense | Expenses |
| 67500 | Interest Expense | Expenses |
| 68000 | Lab Services | Expenses |
| 68500 | Laundry and Cleaning Exp | Expenses |
| 69000 | Legal and Professional Expense | Expenses |
| 69500 | Licenses Expense | Expenses |
| 70000 | Loss on NSF Checks | Expenses |
| 70500 | Maintenance Expense | Expenses |
| 71000 | Meals and Entertainment Exp | Expenses |
| 71500 | Office Expense | Expenses |
| 72000 | Payroll Tax Expense | Expenses |
| 72500 | Penalties and Fines Exp | Expenses |
| 73000 | Other Taxes | Expenses |
| 74000 | Postage Expense | Expenses |
| 74500 | Rent or Lease Expense | Expenses |
| 75000 | Repairs Expense | Expenses |
| 76000 | Supplies Services | Expenses |
| 76500 | Telephone Expense | Expenses |
| 77000 | Salaries Expense | Expenses |
| 77500 | Wages Expense | Expenses |
| 78000 | Utilities Expense | Expenses |
| 78500 | Travel Expense | Expenses |
| 89000 | Other Expense | Expenses |
| 89500 | Purchase Disc-Expense Items | Expenses |
| 90000 | Gain/Loss on Sale of Assets | Expenses |
As we taken out the available chart of accounts for the Chemical Manufacturing Company, Similarly we can take out available chart of accounts for the rest of companies.
The 3rd option means that we can copy settings from an existing Peachtree accounting company as shown below.
After selecting the 3rd option, click the next button to get the following page.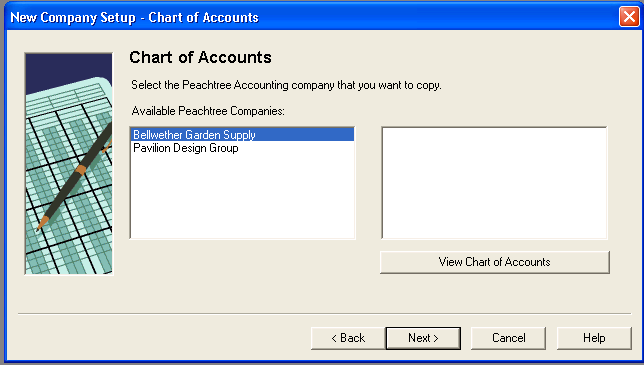
There are two existing companies in Peachtree accounting from where we can copy settings.
If you want to see the chart of accounts of 1st company then as you selected it, just click on “View Chart of Accounts”. And if you want to see the chart of accounts of 2nd company, again select 2nd company first and then click on “View Chart of Accounts”.
If you want to copy setting of the 1st company then select it as above and click on next. After clicking on next you will get the following page before you.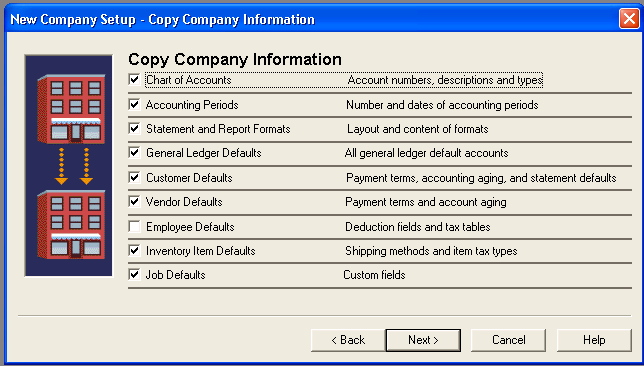
But if you want to copy settings of the 2nd company then first select it as shown below.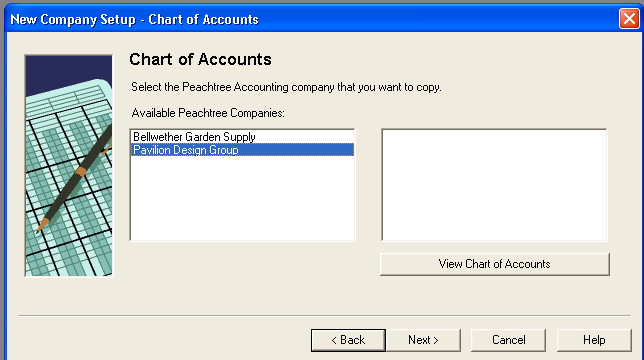
After selecting the 2nd company, click on next you will get the same page before you as shown earlier.
You may copy the settings any one of the companies already existed in Peachtree Accounting.
The 4th option means that we can convert the company from another accounting Programmer. For Example: quick book etc.
First we should choose this option as follows: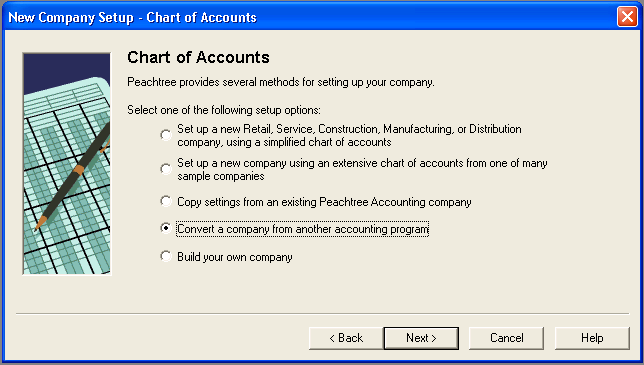
After choosing it, click on next button to precede it.
If you want to build your own chart of Accounts then choose the 5th option as shown below.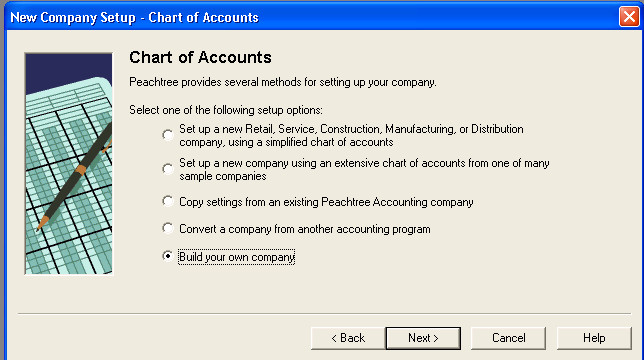
In setting up a new company, it is very important to choose the Accounting Method. Peachtree Accounting provides two Accounting Methods to run you business; one is cash and second is Accrual. Once you choose an Accounting Method it cannot be changed.
Accrual Accounting System is the system in which we record the revenue if we transferred or delivered the goods or provided the services to other, it is irrespective whether cash is received or not. This is the system that is mostly used by the companies. That’s why are also following this system here.
Cash Accounting System is the system in which we record the revenue when we received the cash and record expenses when we made payment.
Select the method of accounting as follows:
After Selecting the Accounting Method, click on next button.
After clicking on next button you will get the page of posting method as follows.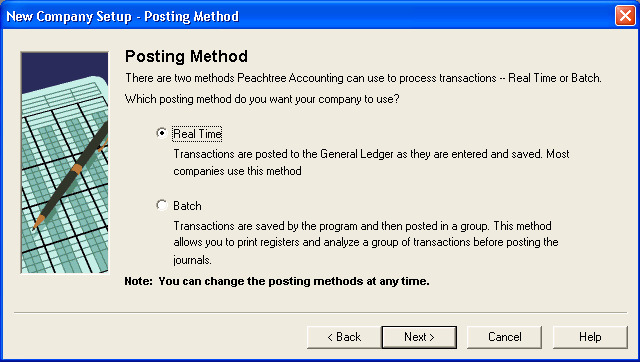
You can change the posting method at any time. So that’s why here we are using the real time posting method that will help us in saving data as they are entered.
And Batch Posting Method allows you to print registers and analyze a group of transactions before posting the journals. It means transactions are saved by the program and then posted in a group.
After clicking on the next button you will get the page of Accounting Periods as follows:
Accounting Period may start as calendar year (jan01- dec31). The 12 monthly Accounting periods means the period of any 12 months.
We are choosing 12 monthly Accounting Period and clicking on next button to further proceed. Then we will get the following page before us.
Accounting Period may not match the calendar year as Financial Year may start from (1st Apr-31st Mar) or from (1st july-31st June) or from (1st Oct-31st Sep).
Then after this click on the next button to get the following congratulation page before you. It means you have completed the required information for setting up a Peachtree Accounting Company. You will get the page as follows:
After clicking the finish button the wizard will be closed.
How to open an existing company
Now if the peach tree software already has an existing company and you want to open it, click on open an existing company that is first heading of the following figure.
After clicking on it, the following page will be displayed before you.
When the above page will be displayed in front of you after clicking on “Open an existing company”. Then click on browse button to select the company that you want to open.
After clicking on browse button you will get the following page in front of you.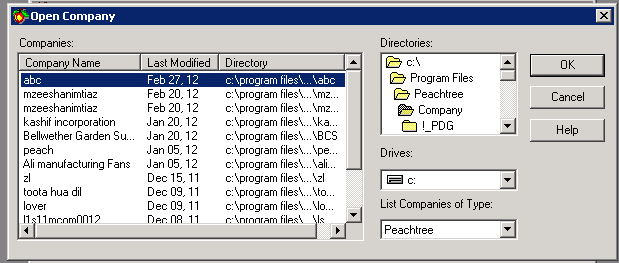
First select derive in which you saved your company. For example if you saved your company in z/drive. Then click on it as follows:
After selecting the z/drive you will get the following page before you.
Similarly in the following diagram as shown below you can see the folders that are open in the big circle and the folders that are not open in small circle.
Then select the company that is shown below as in blue color.
After selecting the company double clicks on it to open the company. When you double click on it your company will open like this as follows: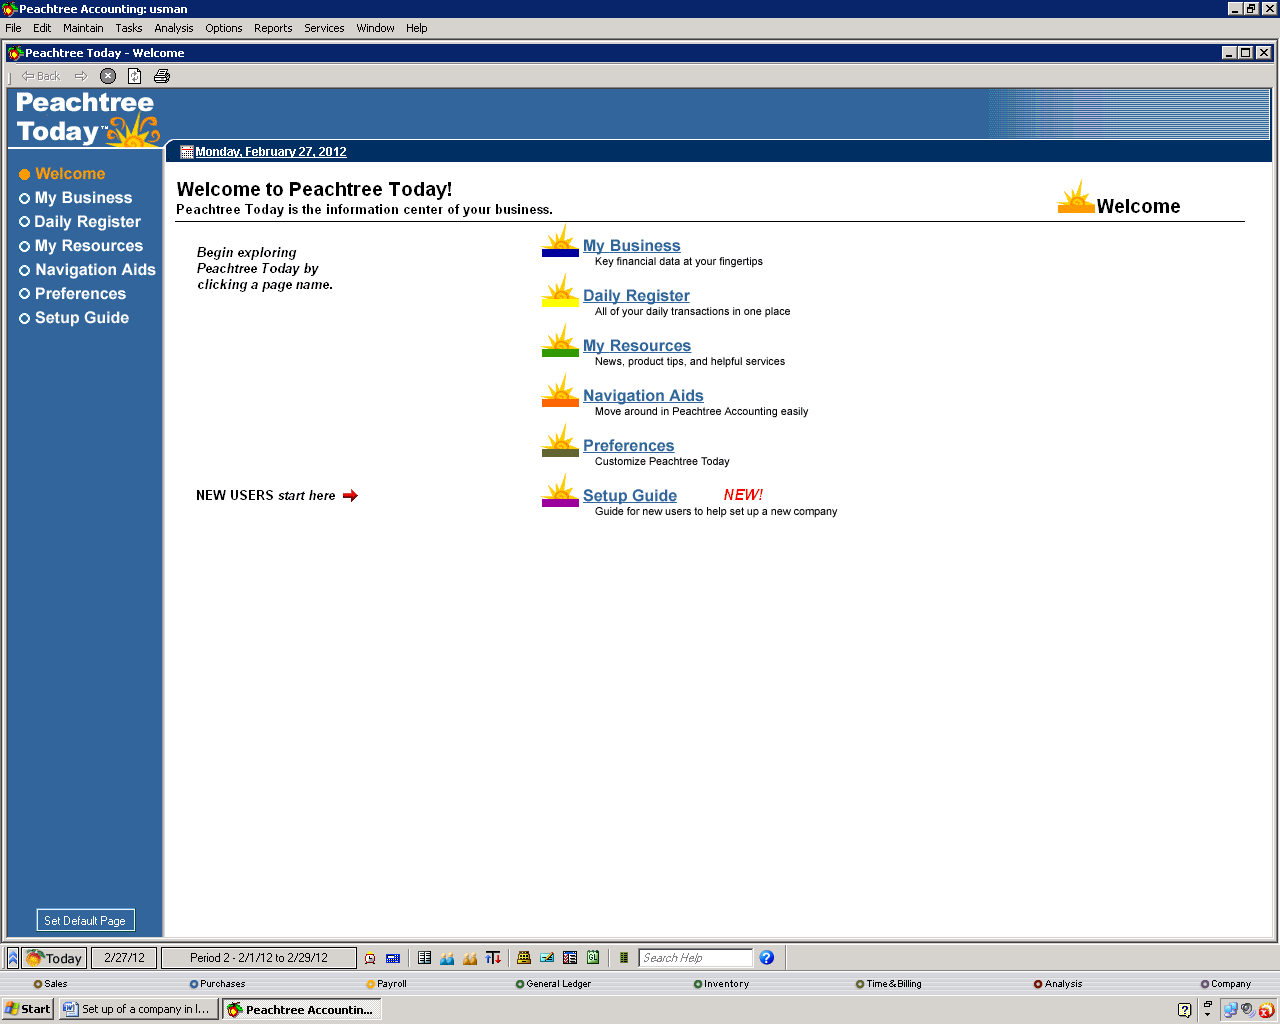
How to maintain chart of Accounts
When the above page will be open then click on maintain button at the top bar as follows:
From the options displayed before you, select the fourth option “charts of accounts” to enter the data of Account title, description and Account type as you selected the option of build your own company in set up a new company.
When you will click on the fourth option “charts of accounts” you will get following page before you: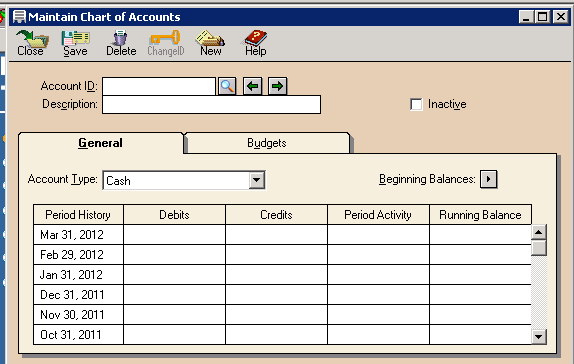
Then start entering the data of Account ID, Description and Account Type. For Example if you want to record the cash in hand, first give ID of the said Account then you should type cash in hand in Description as follows. After that you should select the Account Type from the options available for that relevant account. You can better understand if you will see the following figure.
Account ID is given 105, Cash in Hand is typed in description and cash is selected as Account Type that is highlighted in blue color. If you want to save the data that you have entered then you press the keys of Alt+S, then system will save your data that you entered as you entered cash in hand.
When you will press the Alt+S following figure will be in front of you.
System will automatically select the Account ID from Account type after pressing keys of Alt+S.
And if you want to see all the list of Accounts that you entered in the software, you can do this by clicking on magnifying glass as shown below.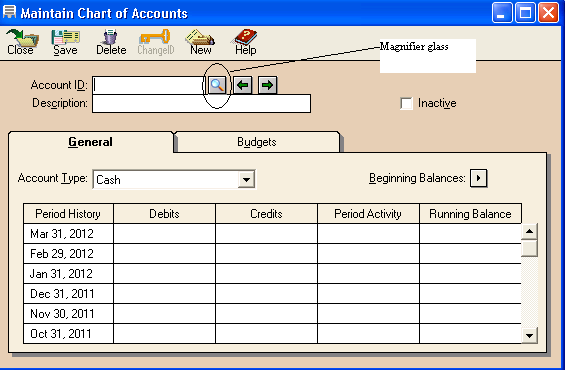
When you will click on magnifier glass you will get the following list of chart of accounts as follows:
If you want to enter the beginning balances of Accounts, then you can do it as follows: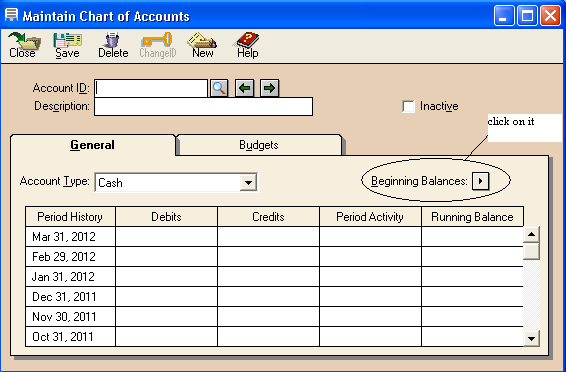
After clicking on the beginning balances you will get the following page as shown below:
Here we entered the beginning balances of Accounts.
If you want to inactive any of the account from the list of Accounts then you can do it by clicking on inactive as shown below. For example If you want to inactive the petty cash than select the petty cash Account and inactive it as below.
If you want to see that which Account you made inactive then you should click on reports and then on General Ledger as shown in the following diagram.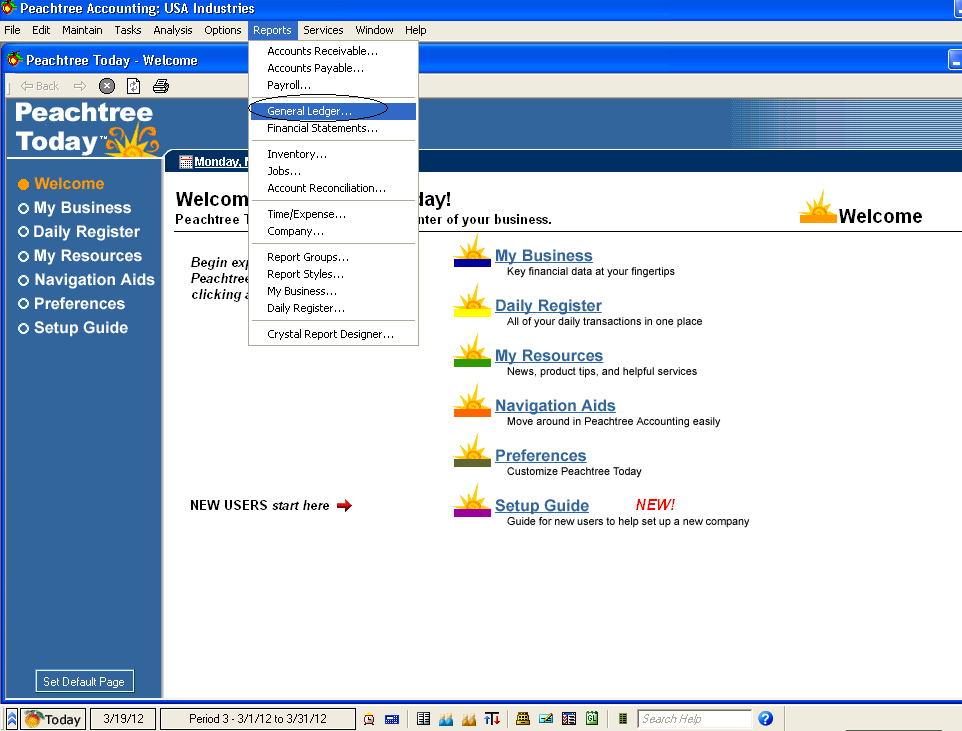
After clicking on general ledger you will get the following page before you.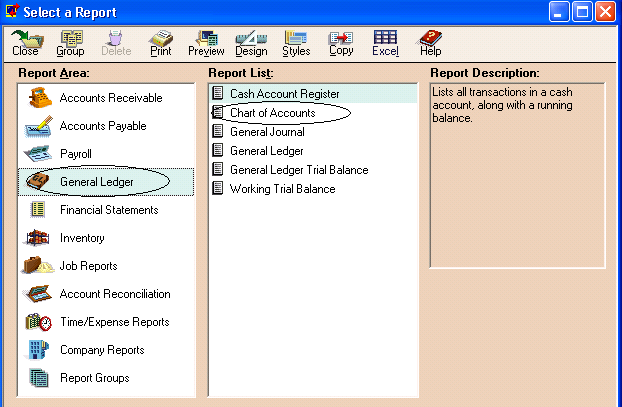
From the above figure first you will select the “Report Area” and after that select the report list as we selected “Chart of Accounts”. When we double click on the “Chart of Accounts” we will get the following list of active and inactive Accounts.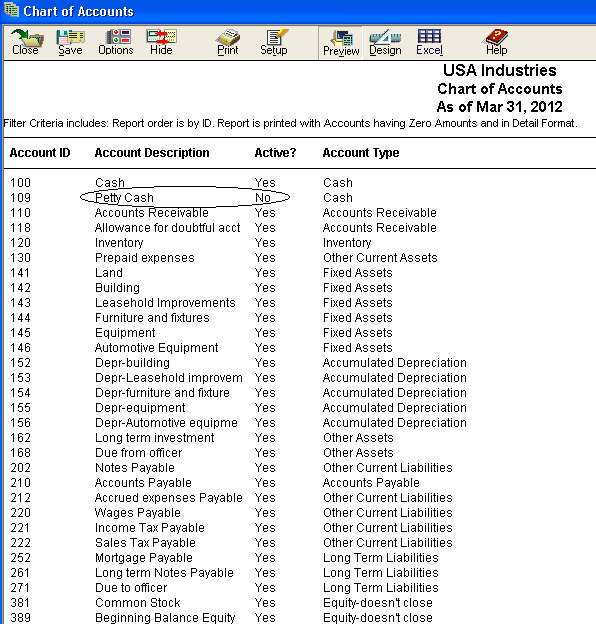
How to maintain Customer\Prospects
If you want to maintain Customers\Prospects Accounts, for that purpose you should click on “Maintain” third option of the menu bar. When you will click on “Maintain” the following options will be in front of you.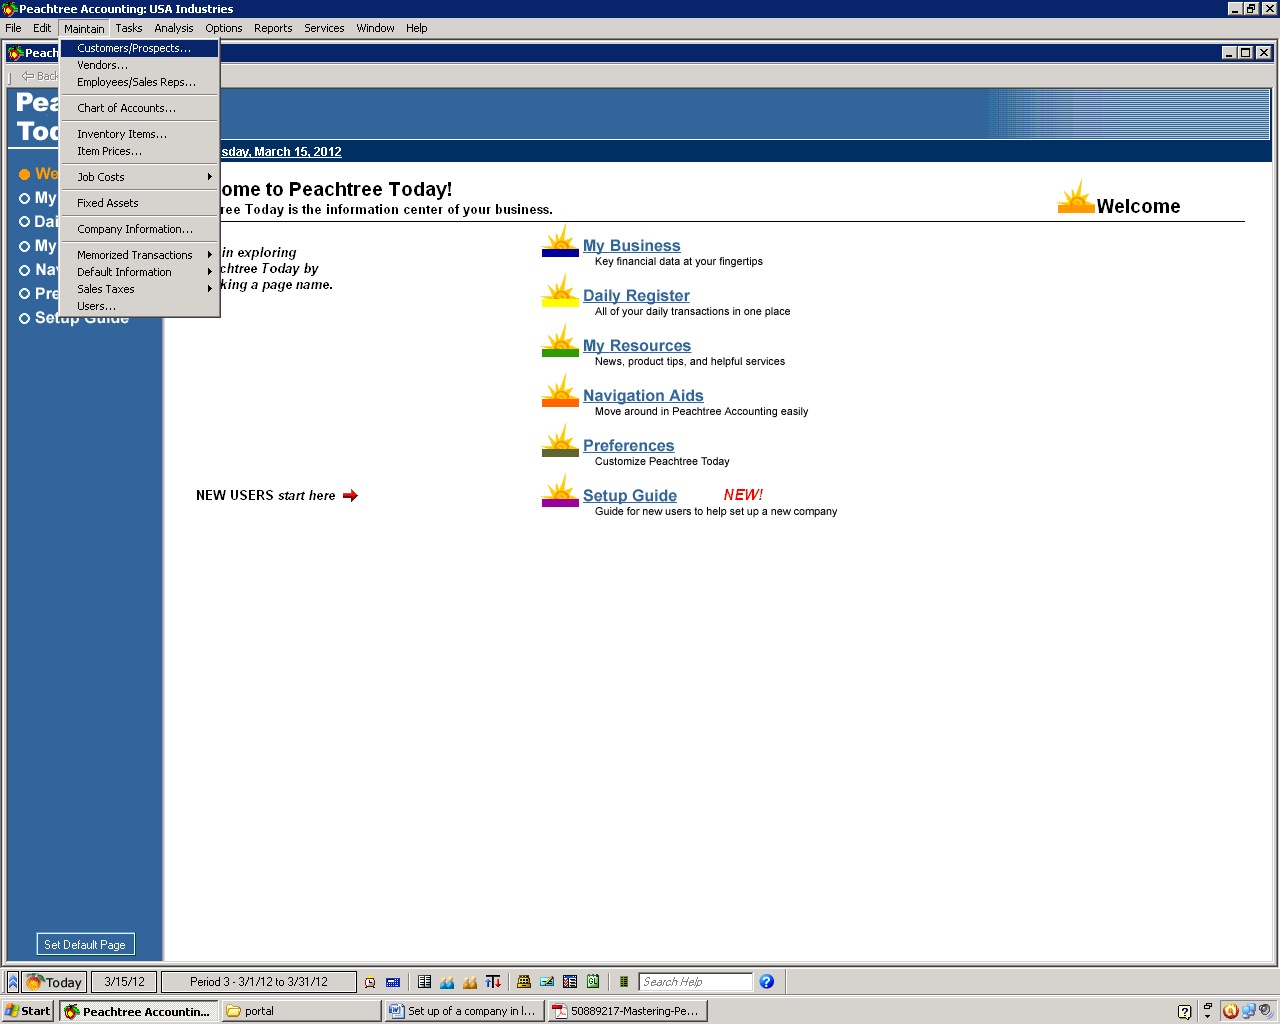
Select the first option “Customers\Prospects” as selected above and click on it. After clicking on it you will get the following page before you.
First of all you will have to enter the Customer ID i.e 100 as this ID is given to the customer in the following figure. Then you will have to enter the name of your customer i.e Sheikh Muzammil is given the name of Customer in the following figure.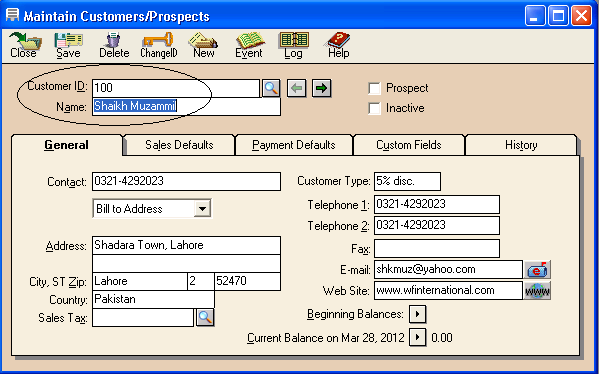
Here from the above page, we are going to discuss the first tab “General” that is bolded in black color. In this tab the first thing you should enter the contact number or mobile number of your customer i.e “0321-4292023” is the contact number of our customer and we have entered it as shown in the following figure.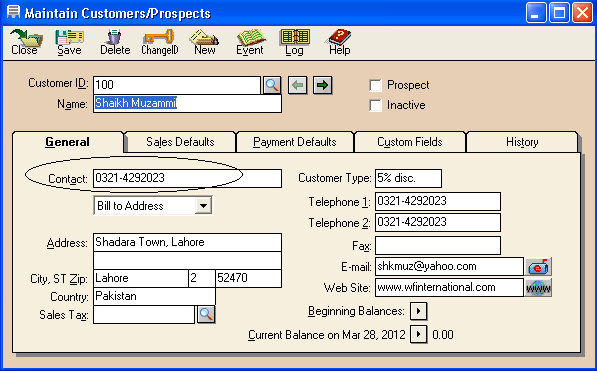
The second thing is that you should enter the Address of your customer i.e “Shahdara Town, Lahore” is the address of our customer and we have entered it as shown in the following figure.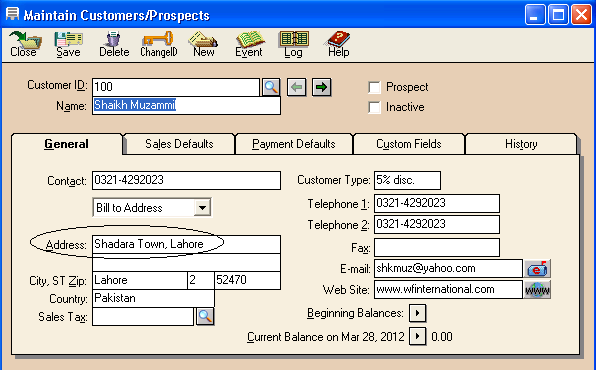
The third thing is that you should enter the city, street, zip and country name ie. Lahore is the city, street is 2nd, zip code is 52470, and country is Pakistan. This data has been entered in the following figure as shown below.
In “Customer Type” you will have to enter the discount rate that you are allowing to that customer i.e 5% discount is given to Sheikh Muzammil and we enter this information as follows: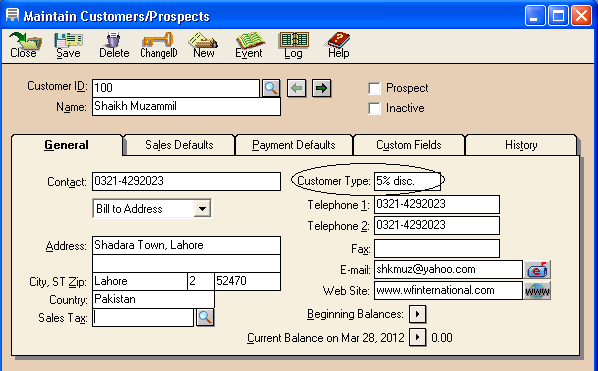
Then after that write down the telephone numbers of your customer’s offices as shown below.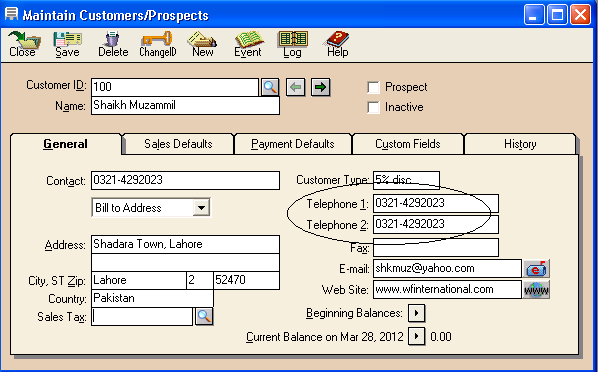
Then next thing is you should enter the fax number of your customer and then E-Mail address and then Website as shown below: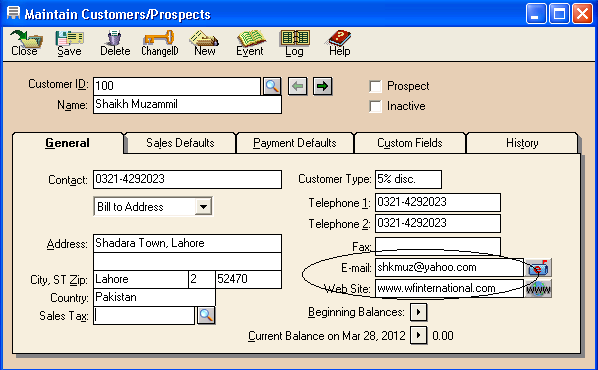
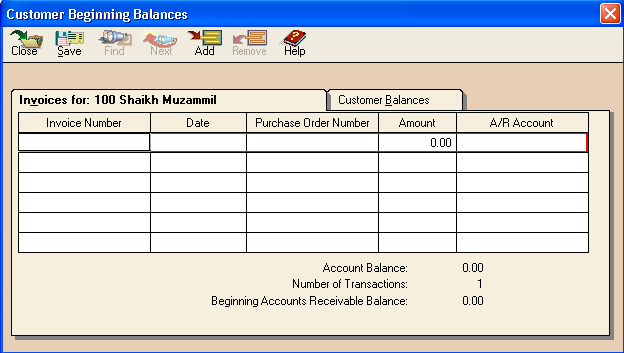
If you want to see the beginning balances of that customer then click on Beginning balance option as follows:
When you will click on beginning balance sign 
Now if you want to save up to this, then Press Alt+S or click on “Save” as follows: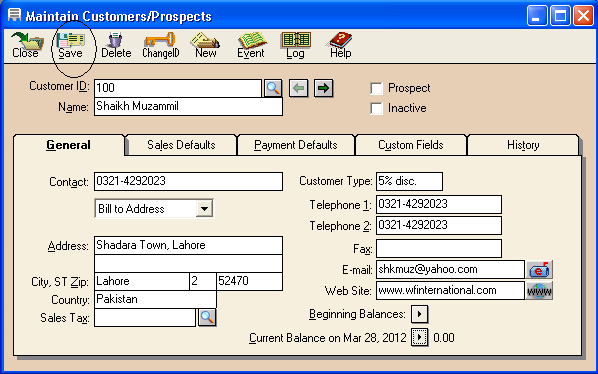
If you have more than one customer i.e your one customer is Qasim Ali then you may also enter the whole information of Qasim Ali as done of Seikh Muzammil. But for that purpose you will have to click first on “New” available on the toolbar of the screen as follows: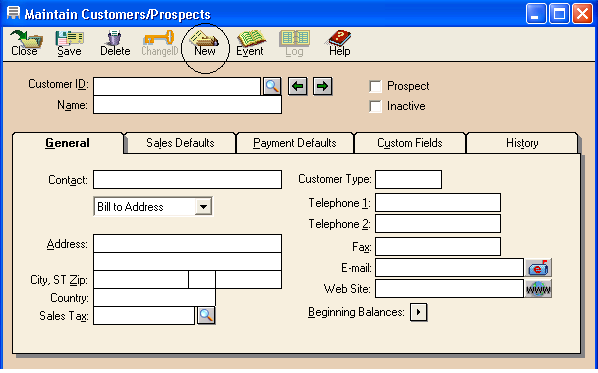
When you will click on “New” then above page will be in front of you. After that you will have to enter the information of your new customer as follows.And similarly add all the relevant information of our customer as done of Sheikh Muzamil.
If your customer i.e Qasim is died then you can remove all the relevant information from the peachtree accounting software as follows:
In the above screen if you will open Qasim’s Account and click on “Delete” given on the menu bar. After clicking on “Delete”, all the information of your customer Qasim will be deleted from your Peachtree Accounting Software.
Now we are going to discuss the second Tab “Sales Default”.
In this tab General Ledger Sales Account is not needed to type. You should click on Magnifier glass
Now we are going to discuss the third tab that is “Payment Defaults”. Here the most important thing is to enter the Credit Card Number of your customer through which you will get payment of your sales to that customer.
Now if you want to get payment from that customer in cash then you should inactive “Use receipt Window settings” as follows:
Now we are going to discuss the fourth tab that is “Custom Fields”. Here the most important thing is to enter the name of “second contact” which means the name of that person with whom we can deal if our Customer Sheikh Muzamil is not available.
And the next thing is “Reference” which means that by which means you know and attached with your customer (Sheikh Muzamil). And the last thing under this tab is the head office location of our customer. All these information is provided as follows:
Now we are going to discuss the last tab that is “History”. Here the most important thing is to write down that from which date you are having deal with your customer and the last invoice date when you received your payment from your customer. For all that purpose you should click on the following picture of calendar.
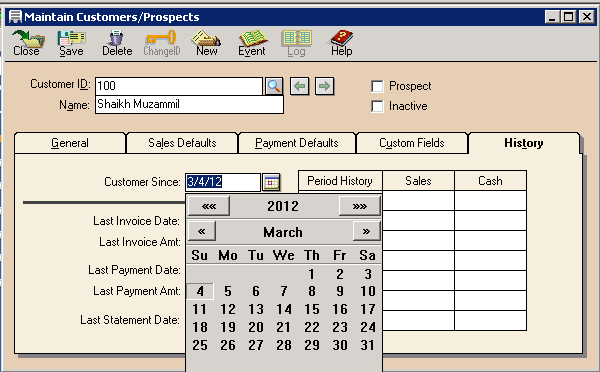
And then select the time period from the calendar of above screen.
After you will enter the data of all the dates of your customer joining with you and last invoice date and last date of getting payment from him then close this screen and reopen it you will get the Following screen in from of you.
You can also Inactive your Customer’s Account by just Active your “Inactive” option as given under the Prospect.
Customer Default Information
Customer Default Information means the detailed information of your customer that you have entered in the peach tree Accounting software 2004.
Now if you want to see the information of your existing customer, then following steps be taken into consideration:
First open an existing company in Peach tree Accounting Software, when that welcome screen will be in front of you, then just click on “Maintain” on the main menu bar. After clicking on it select the third last option of “Default Information” and click on first sub option of Default Information as shown below: 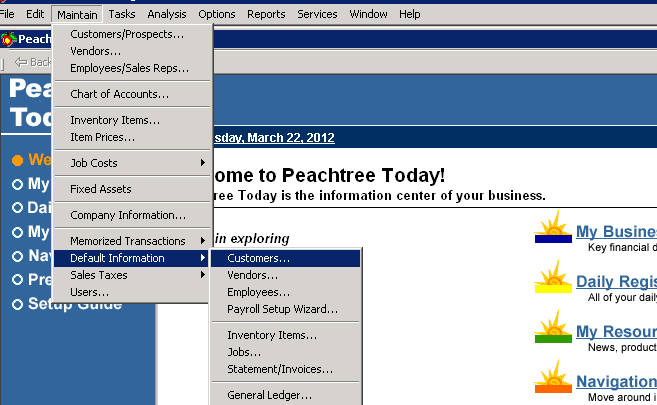
When you will click on sub option “Customers”, you will get the following next screen in front of you.
The above screen consist of five tabs and in these tabs the whole information that is neceesary about our customer is recorded.
First of all we are going to discuss the first tab “Payment Terms” which means that how you are getting payment form your customer in which manner of terms and up to how much cridit limits is being provided to them. In the following figure, the standard terms are given on left side i.e C.O.D, Prepaid, Due in number of days, Due on day of next month, Due at end of month.
If you will select the first standard term “C.O.D” then the following options of payment due in whatever days, Dash % discount will be allowed if our customer make payment within Dash days, will be inactive as shown in the following diagram:
And up to Amount of $2500 is the credit limit which means that your customer can get goods on credit up to worth $2500. Then we select the Sales Account as default of General Ledger Sales Account by clicking on the magnifier glass then choose sales Account from list of Accounts.
If you will select the second standard term “Prepaid” then the following options of payment due in whatever days, Dash % discount will be allowed if our customer make payment within Dash days, will be inactive as shown in the following diagram:
And up to Amount of $2500 is the credit limit which means that your customer can get goods on credit up to worth $2500. Then we select the Sales Account as default of General Ledger Sales Account by clicking on the magnifier glass then choose sales Account from list of Accounts.
If you will select the third standard term “Due in number of Days” which means that after the specific date you are going to receive payment from your customer. For Example You sold goods to your customer of $ 2500 today on credit and customer is ready to make payment after 20 days and you are allowing him 5% discount if he will make that payment within 10 days. If customer could not pay you within 10 days then he will not avail discount and will have to make full payment to you after 10 days. This example can also be expressed as in the following diagram:
If you will select the fourth standard term “Due on day of next month” which means you make credit sale to your customer is going to met cash on that specific day of next month. For Example, You sold goods to your customer of $ 2500 today on credit and customer is ready to make payment on 20th day of the next month and you are allowing him 5% discount if he will make that payment within 10th day of the next month. If customer could not pay you within 10th day of the next month then he will not avail discount and will have to make full payment to you after 10th day of the next month. This example can also be expressed as in the following diagram:
If you will select the fifth standard term “Due at end of month” which means you make credit sale to your customer and it is going to met cash at end of that specific month. For Example, You sold goods to your customer of $ 2500 today on 1st March on credit and customer is ready to make payment at the end of month and you are allowing him 5% discount if he will make that payment within 10th date of march month. If customer could not pay you within 10th date of march month then he will not avail discount and will have to make full payment to you after 10th date of march month. This example can also be expressed as in the following diagram: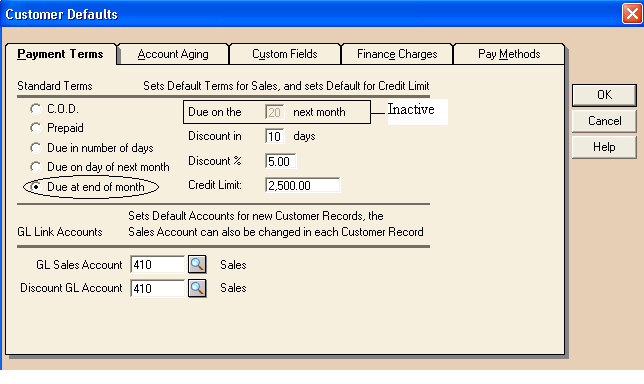
Now we are going to discuss the second tab of Customer Default which is “Account Aging” which tell us how sales invoices are aged and what aging brackets will be used for Accounts Recievable. This is as shown in the following diagram: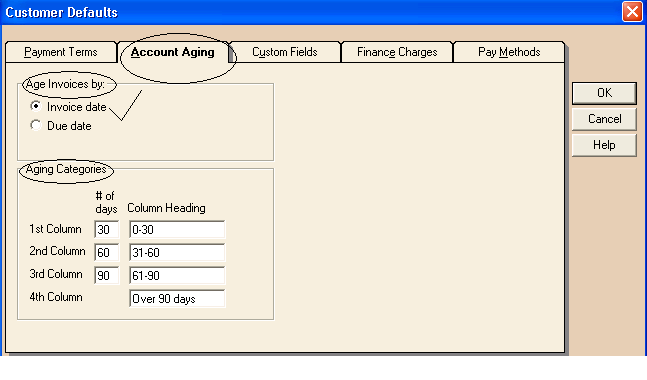
Age Invoices By
Choose either Invoice Date or Due Date. If you age by invoice date, this will show how old each customer invoice and balance is. If you age by Due Date, this will show how overdue each customer invoice is.
We are going to choose to age customers by Invoice Date.
Aging Categories
This can best be explained by coding one of the following example and Diagram.
For example, entering 30 for the 1st column would display all current invoices 30 days late. Entering 60 for the 2nd column would display all invoices that are between 31 and 60 days overdue. Entering 90 in the 3rd column displays all invoices that are more than between 61 and 90 days overdue. The fourth column will show all invoices that are more than 91 days overdue.
Diagram:
Now we are going to discuss the third tab of Customer Default Information that is “Custom Fields”. Here the most important thing is to enable the Field Labels Second Contact, Reference, Mailing List and Head Office which means that when you will see the customer default information all the enable information of your customer will be shown. The field label should be enabled as follows: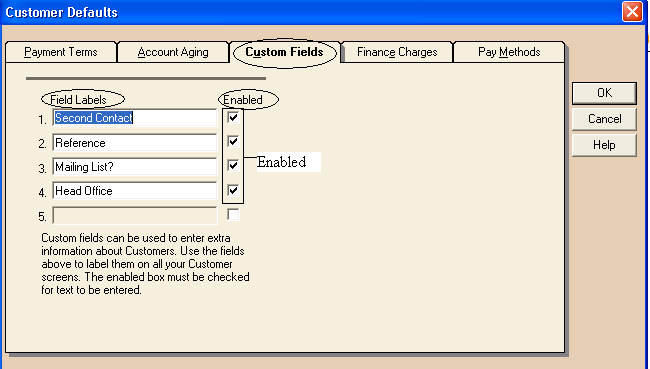
Now we are going to discuss the fourth tab of Customer Defaults Information which is “finance charges” which means late charges or service charges. Once finance charges are activated, you can set conditions for calculating finance charges.
Finance charge will be imposed on the balance due after a 30-day grace period. Finance charges are calculated from the first day the invoice becomes overdue, not from the beginning of this grace period, as following figure showing that if the invoices become overdue for more than 30 days then finance charges will charge after the 30 day grace period. And then enter the annual interest rate for balances at or below the specified dollar amount. Enter the annual interest rate for balances above the specified dollar amount. If you want to enter only one rate, enter the same amount in both boxes as we did 3% in the following diagram.
Enter the minimum finance charge dollar amount that will apply when a customer is late with a payment. If the calculated amount is less than the minimum displayed here, the minimum amount will be used. The default minimum amount is 75 Dollars.
We selected the check box as we want to compound late charges. We can also say as, do you want to charge late charges on late charges?
G/L account that will be used when applying finance charges (for example, Finance Charge Income).
We selected “late charge” to be appearing on invoices and statements.
Now we are going to discuss the last tab of Customer Defaults Information which is “Pay Methods” means that by which method you are going to receive payment from your customer cash, check, VISA, Master Card, or some other method.
Maintain Vendors
First of all I would like to tell you that what does vendors means. It may mean that the companies or people from whom you have purchased the goods.
Now if we want to maintain Vendors in Peachtree Accounting Software 2004, we should click on “Maintain” available in the menu bar of the Welcome Screen Wizard of Peachtree Accounting Software 2004 as follows:
When you will click on Maintain the drop down list will be in front of you and then select vendor second option of the drop down list as follows: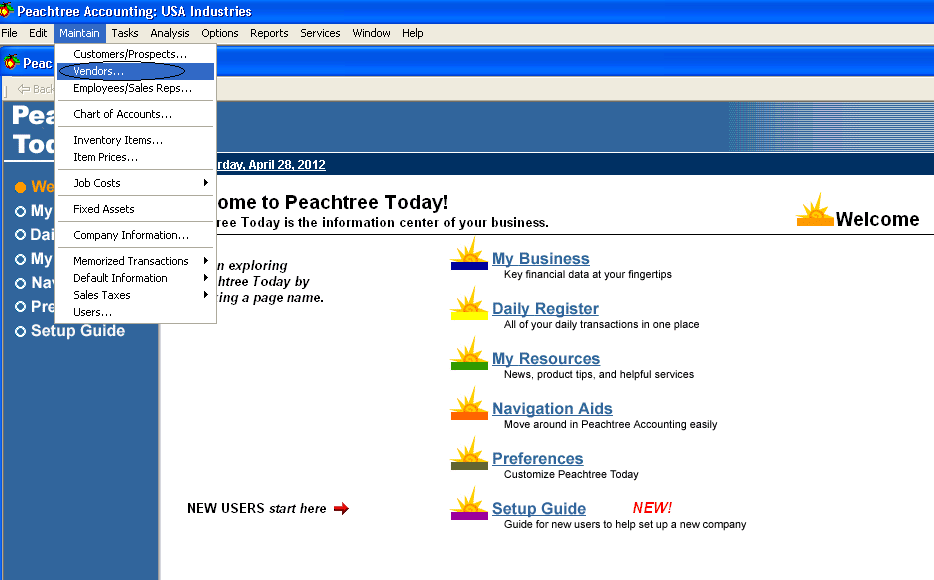
When you will click on the “Vendor” then following page will be in front of you.
First of all you will have to enter the Vendor ID i.e 100 as this ID is given to the Vendor in the following figure. Then you will have to enter the name of your Vendor i.e Qasim Ali is given the name of Vendor in the following figure.
Here from the above page, we are going to discuss the first tab “General” that is bolded in black color. In this tab the first thing you should enter the contact number or mobile number of your Vendor i.e “0331-4368821” is the contact number of our vendor and we have entered it as shown in the following figure.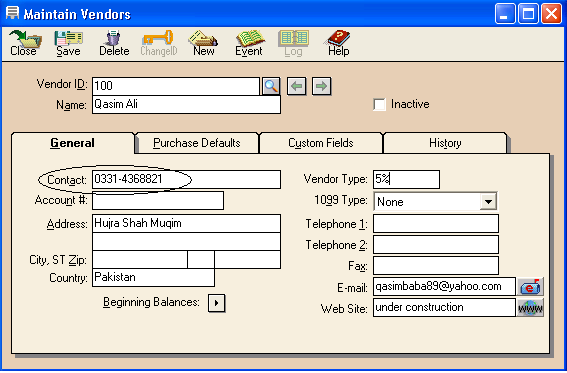
The second thing is that you should enter the Address of your customer i.e “Hujra Shah Muqim” is the address of our vendor and we have entered it as shown in the following figure.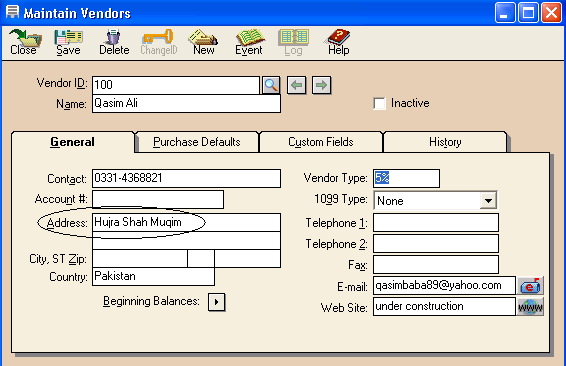
The third thing is that you should enter the city, street, zip and country name ie. Hujra shah mukim is the city, street is 2nd, zip code is 52470, and country is Pakistan. This data has been entered in the following figure as shown below.
In “Vendor Type” you will have to enter the discount rate that you are availing frm the vendor i.e 5% discount is being received from vendor Qasim Ali and we enter this information as follows:
Then after that write down the telephone numbers of your Vendor’s offices as shown below.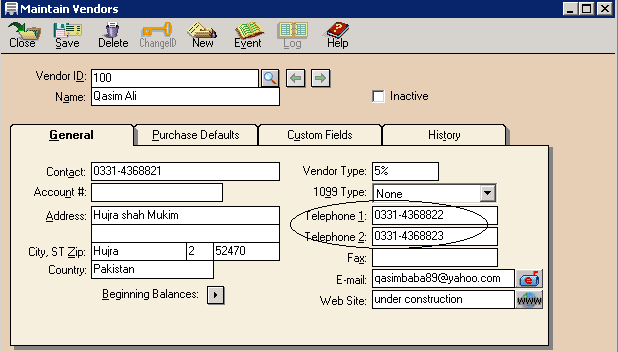
Then next thing is you should enter the fax number of your customer and then E-Mail address and then Website as shown below: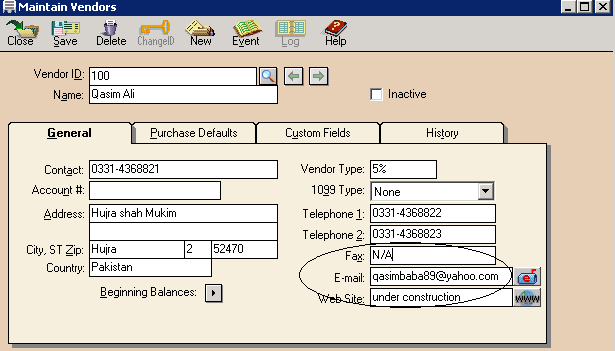
Now the next important thing is on the 2nd tab “Purchase default” When you will click on it following screen will be in front of you.
Then click on Purchase Account’s Magnifier glass and select “Inventory” having Account ID 120 in the charts of Accounts.
If you want to see the beginning balances of that vendor then click on Beginning balance option as follows: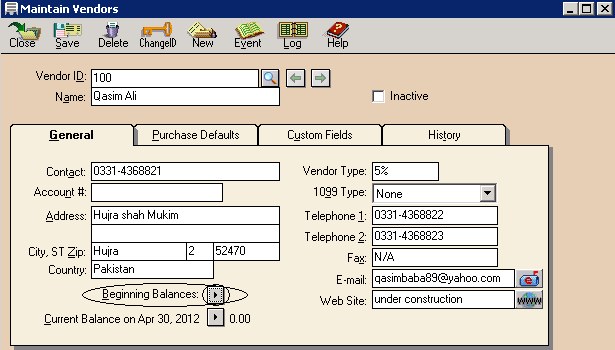
When you will click on beginning balance sign 
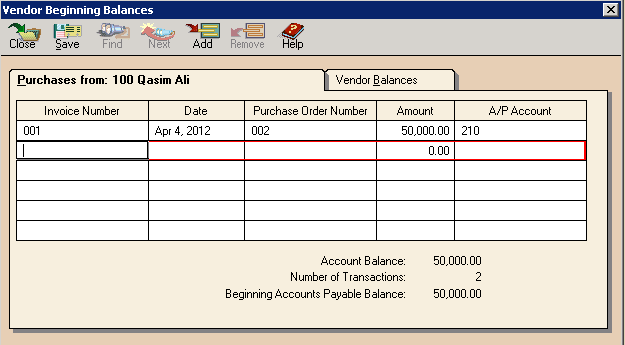
Now if you want to save up to this, then Press Alt+S or click on “Save” as follows: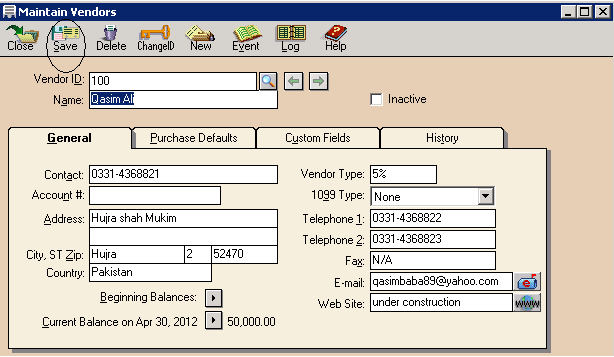
If you have more than one vendor i.e. your one vendor is M. Zeeshan Imtiaz then you may also enter the whole information of M. Zeeshan Imtiaz as done of Qasim Ali. But for that purpose you will have to click first on “New” available on the toolbar of the screen as follows: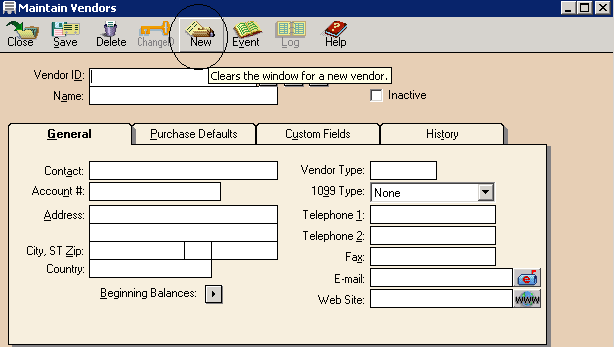
When you will click on “New” then above page will be in front of you. After that you will have to enter the information of your new vendor as follows.And similarly add all the relevant information of our customer as done of Qasim Ali.If your customer i.e Qasim is died then you can remove all the relevant information from the peachtree accounting software as follows:
In the above screen if you will open Qasim’s Account and click on “Delete” given on the menu bar. After clicking on “Delete”, all the information of your customer Qasim will be deleted from your Peachtree Accounting Software.
Maintain Inventory Items
First of all I would like to tell you that what does inventory means. It may mean the raw material, work in process and finished goods inventory. Now if we want to maintain Inventory Items in Peachtree Accounting Software 2004, we should click on “Maintain” available in the menu bar of the Welcome Screen Wizard of Peachtree Accounting Software 2004 as follows: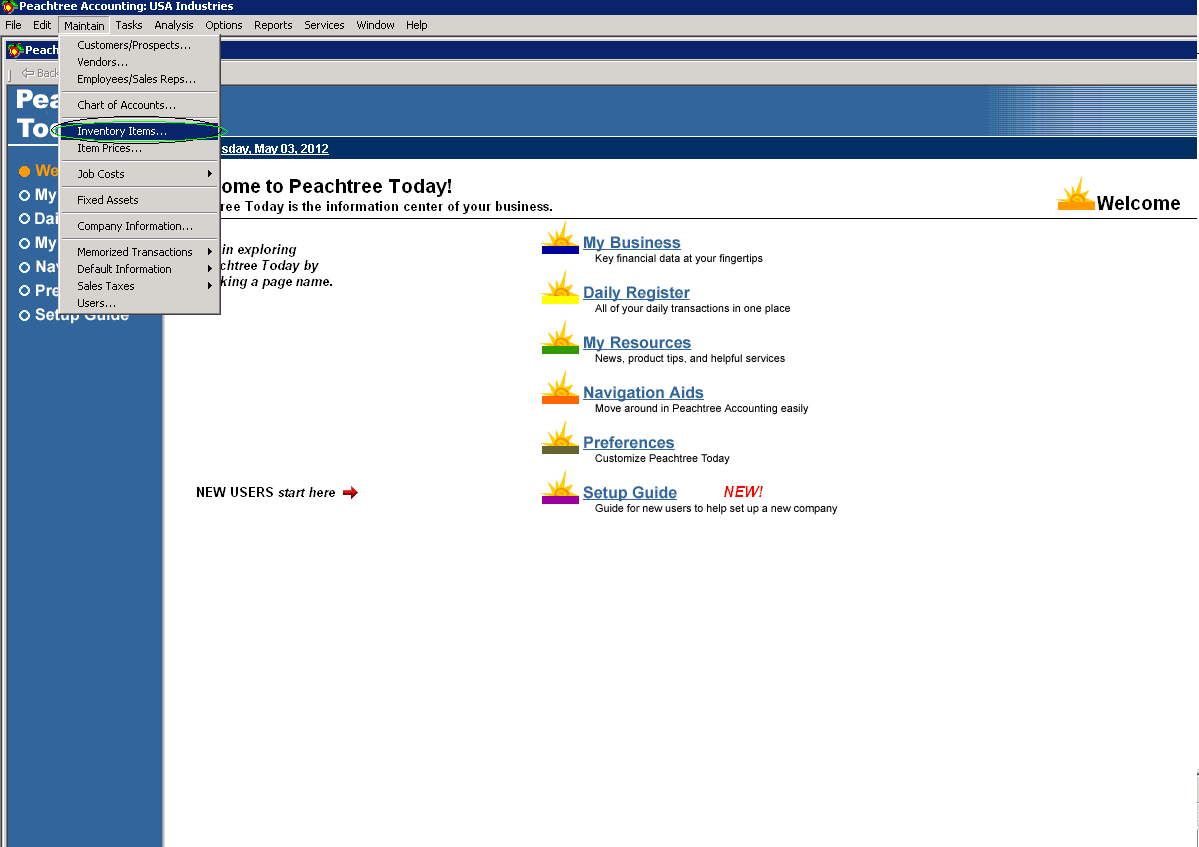
When you will click on the “Inventory Items” then following page will be in front of you. This displays the Maintain Inventory Items window where you can enter the details of the inventory item into Peachtree.
When the above page will be open, you will have to Give the ID to the Item and then write description of that item as follows:
And then we should select the Item class as for “peanuts” we choose “stock item” as an Item Class. Peanuts will help in making us finished or assembled product and that is the ultimate cake. After selecting the stock item as an item class we must select the general ledger sales account, general ledger inventory account and general ledger cost of sales account from the charts of accounts by clicking on magnifier glass as shown in the following figures (a), (b) & (c).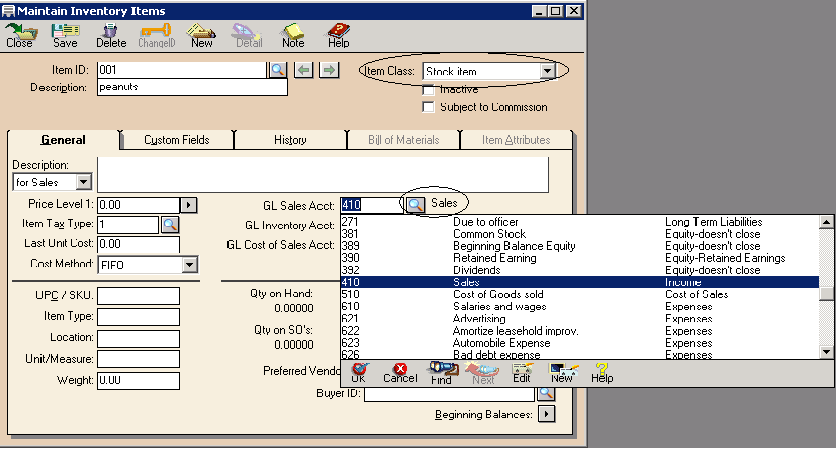
Fig (a)
Fig (b)
Fig (c)
If you want to save up to this then you should click on save button or you should press the keys Alt+S.
Then do again the same process for the “Cream” required for making the cake. We should give the Item ID and Write the description as same as done of Peanuts. Here for your convenience we are going to show you the figure which depicts how to do for cream.
The next thing required to make the cake is sugar and the same process will be adopted for sugar as follows in the figure.
The next thing required making cake is berries and the same process will be for berries as shown in the following figure.
The next thing required making cake is cost of labor and the same process will be for labor but the difference is only that will give the labor as item class and the General Ledger Inventory Account will be replaced by Salaries and Wages Account as shown in the following figure.
After all the given effort your cake will be ready and to record the cake as a finished product that is ready to sell in the market you will have to follow the following procedure.
The procedure is that first you will have the give the ID to cake and then type “cake” in Description after that you should select the Assembly as an item class then click on magnifier glass to select the relevant general ledger accounts from the charts of accounts and selected unit in kg as shown in below figure.
After the first tab “general” We will have to select the fourth tab “Bill of Materials”. In this tab we will have to record the Item ID and the description and the quantity needed of sugar, berries, cream and peanuts to make the cake. This can be explained by the following figure.
Here in the above figure if you will click under Item ID there you will see the magnifier glass and select the Item ID and then give description of that Item ID and the type the quantity required to make the cake. This all is shown in the following figure.
Then after that you should save the data as you entered by clicking on “Save” button or by pressing Alt+S. If you want see the report of all you inventory items then you can do this by clicking on “Reports” on the main menu bar of Peachtree Accounting Software 2004 and then select inventory which is available on sixth number as shown in the following figure.
When you will click on “inventory” the following page will be in front of you and from this page you will have to select the “Assembly list” as highlighted in the following figure.
When you will click on the “Assembly list” you will get the list as follows.
Quotes
First of all let me clear you about what actually quote is in simple words, it means the estimated printed sales to the existing customer or new customer in which the specifications of the product is also written and the price of each product is also written and the date when this quotes will be expired can also be written.
Now let me tell you people that if you want to make the quotes in Peachtree accounting software then which steps you should follow.
First of all open the “Welcome Window” and from that window click on the main menu bar “Task” and select the top one option of “Quotes/Sales Order” and then select “Quotes” from the given two options of task menu bar of Peachtree Accounting Software 2004 as follows: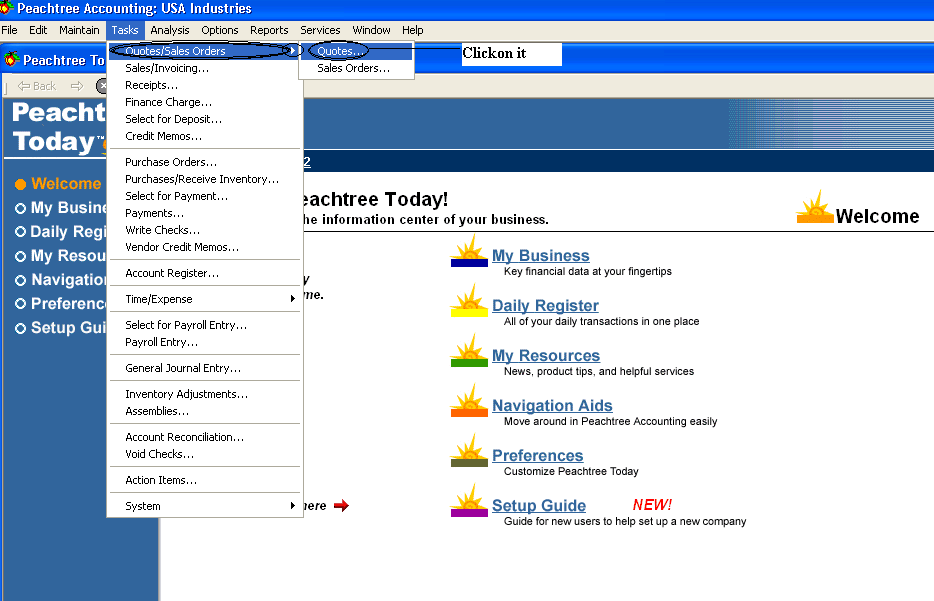
When you will click on the Quotes the following page of quotes will be in front of you.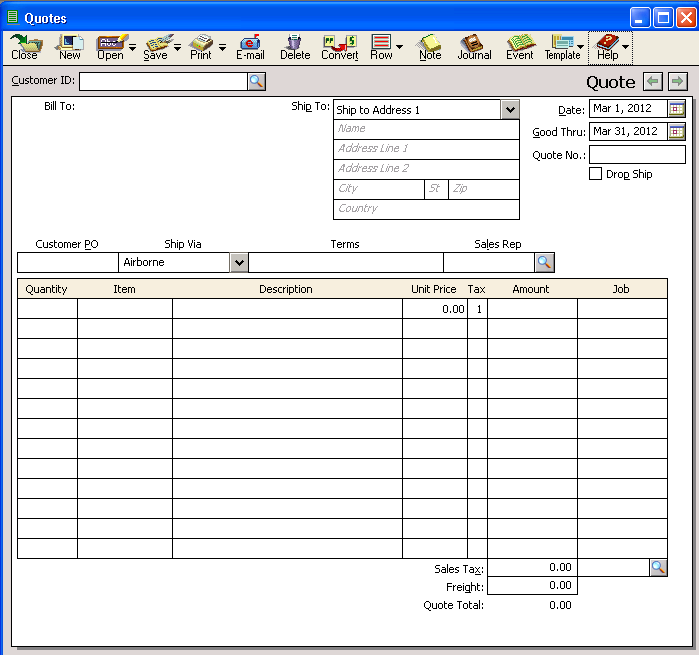
First of all we will fill the quotes with customer id in the customer id field by clicking on magnifier glass as we have already two customers (Shaikh muzamil and Qasim ali) as entered earlier but if we had new customer for whose we had not maintain customer prospects accounts then we should double click on the customer id field then the following page will be in front of you and in this page you will first maintain that new customer prospect accounts as done earlier for old customers (Shaikh muzamil and Qasim ali).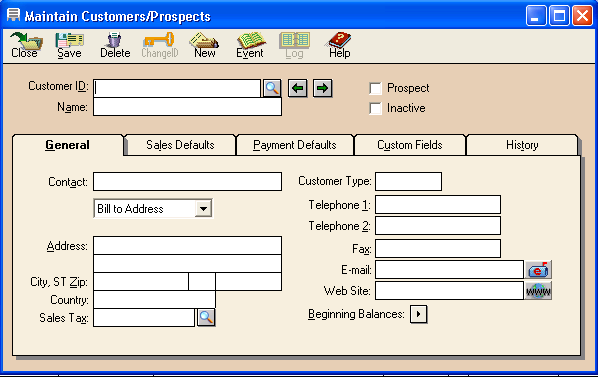
But if you want to make quote for Shaikh muzamil then you can make quote by just clicking on the magnifier glass 

When you will select the first customer Shaikh Muzamil then software will show the customer id and all of the information of customer Shaikh Muzamil as software has shown the address of the customer and the terms with that customer as we entered while maintaining that customer prospects. This can be seen in the following figure.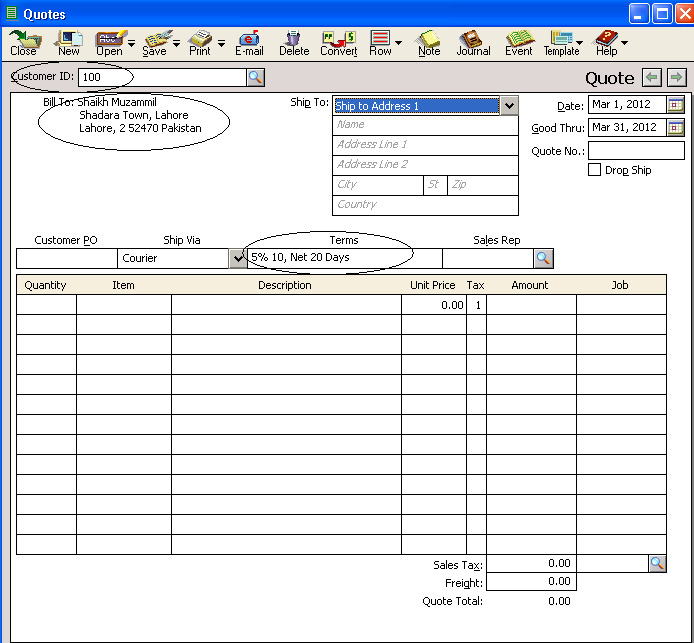
Ship to: Address line 1 means the goods will be delivered to that address that were entered while maintain the customer prospects accounts
Date: it means select the date in which you are going to issue the quote.
Good thru: it means the date when the quote will be expired or invalid.
Drop Ship: It means that the items will be shipped directly to the customer (Shaikh Muzamil) from your vendor (M. Zeeshan Imtiaz).
Quote No: It is necessary to give the number to the quote.
Customer PO: It means that customer has sent you purchase order and you are going to send quote to that customer against that purchase order then you should give the purchase order number to that quote as well but if your customer did not send you any purchase order then you can leave the purchase order number blank.
Quantity: Select the quantity that you are going to sell and the click on magnifier glass to select the “item” when you will select the item the description will be shown automatically and then give the per unit price then the Software will calculate the amount automatically as shown in the following figure.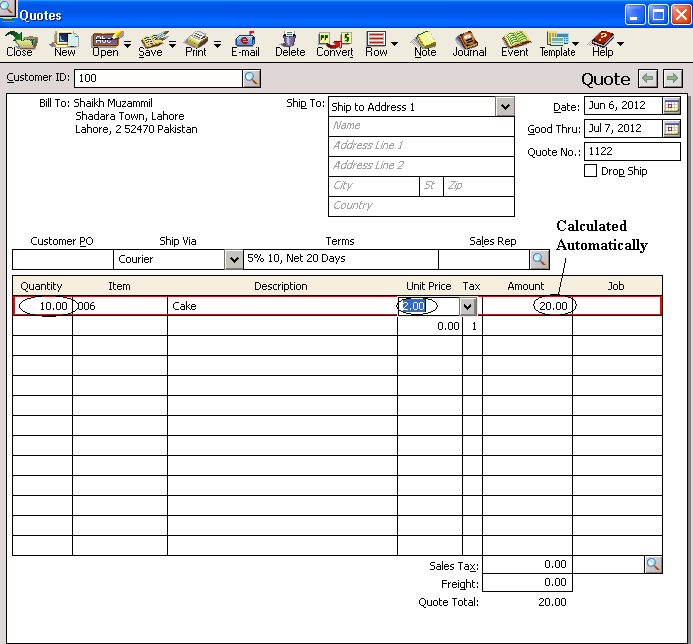
If our company is registered under sales tax act 1990 as manufacturer then we can being the manufacture enter the sales tax if any, and then freight charges.
After that we can save the quote by clicking on save icon shown at the top of the quotes or we can also save it by pressing the keys Alt+S.
After you save the quote you can convert that quote by clicking on the “convert” icon that is available at the top of the quote menu bar. When you print or save a sales quote, you do not actually update accounting information. The sale is recorded and accounting information updated when you convert the quote to a sales invoice. To convert a quote to a sales order or to a sales invoice, select the Convert button in the Quotes window.
Here we are going to convert the quotes to sales order by selecting the sales order and clicking on ok as follows.
Sales Order
First of all let me clear you about what actually sales orders is in simple words, it means it is an order issued by a business to a customer. A sales order may be for products and/or services. Sales order, sometimes abbreviated as SO.
Now if you want to open the sales order in the Peachtree Accounting Software 2004 then you should again click on “task” available at the top on main menu bar and then take your mouse to the “Quotes/Sales Orders” and then select the “sales orders” from the submenu as shown in the following figure.
When you will click on the “sales order” the following window of the “sales order” will be open as follows.
First of all we will fill the sales orders with customer id in the customer id field by clicking on magnifier glass as we have already two customers (Shaikh muzamil and Qasim ali) as entered earlier but if we had new customer for whose we had not maintain customer prospects accounts then we should double click on the customer id field then the following page will be in front of you and in this page you will first maintain that new customer prospect accounts as done earlier for old customers (Shaikh muzamil and Qasim ali).
But if you want to make “sales order” for Shaikh muzamil then you can make “sales order” by just opening that sales order and clicking on the
When you will click on this icon 
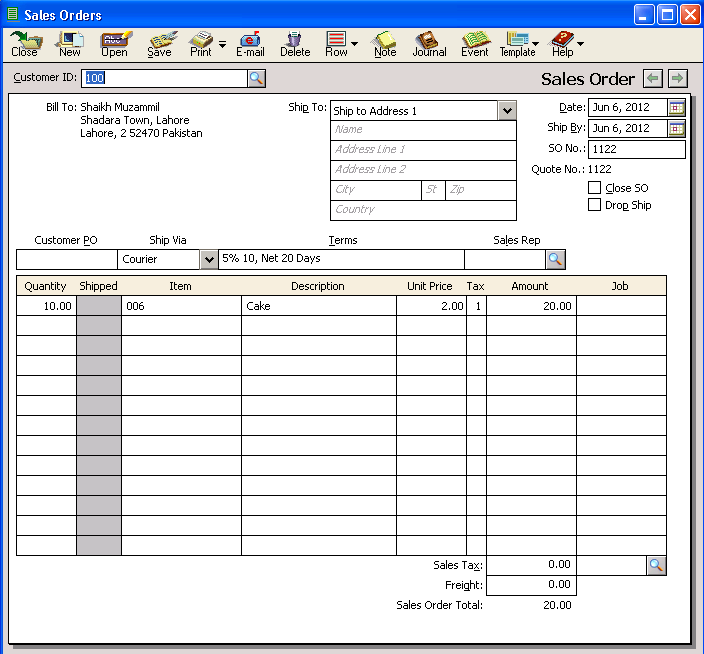
Ship to: Address line 1 means the goods will be delivered to that address that were entered while maintain the customer prospects accounts
Date: it means select the date in which you are going to make the sales order.
Ship by: it means the date by which the sales order must be shipped.
Sales order & Quotes no: Give them number if any as we gave number in the following figure.
Close So: Select this check box when everything on the sales order has been shipped or you want to close the sales order because the remaining items will not be arriving.
Drop Ship: It means that the items will be shipped directly to the customer (Shaikh Muzamil) from your vendor (M. Zeeshan Imtiaz).
Quote No: It is necessary to give the Quote number to the sales order.
Customer PO: It means that customer has sent you purchase order and you are going to send sales order to that customer against that purchase order then you should type the purchase order number to that sales order as well but if your customer did not send you any purchase order then you can leave the purchase order number blank.
Quantity: Select the quantity that you are going to sell and the click on magnifier glass to select the “item” when you will select the item the description will be shown automatically and then give the per unit price then the Software will calculate the amount automatically as shown in the following figure.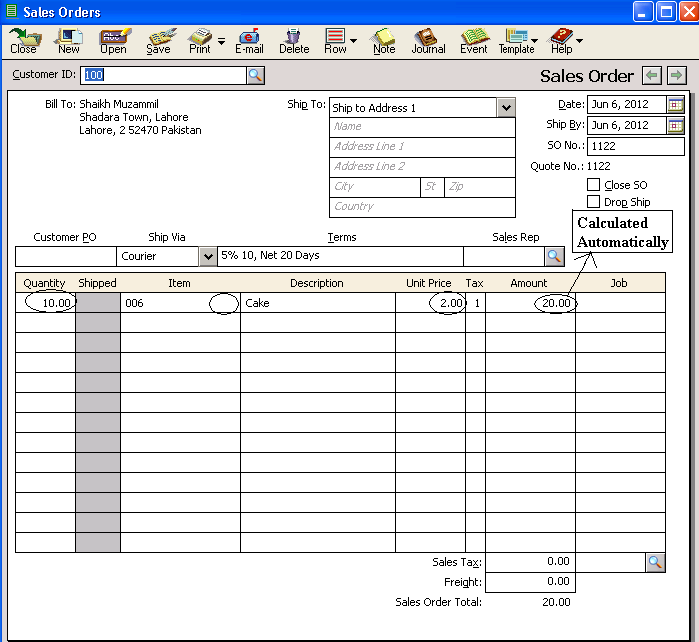
If our company is registered under sales tax act 1990 as manufacturer then we can being the manufacture enter the sales tax if any, and then freight charges.
After that we can save the sales order by clicking on save icon shown at the top of the sales orders or we can also save it by pressing the keys Alt+S.
Sales Invoice
First of all let me clear you about what actually “sales invoice” is in simple words, it means it is an invoice or bill and a commercial document issued by a seller to the buyer, indicating the products, quantities, and agreed prices for products or services the seller has provided the buyer. An invoice indicates the buyer must pay the seller, according to the payment terms. The buyer has a maximum amount of days to pay for these goods and is sometimes offered a discount if paid before the due date.
Now if you want to open the sales order in the Peachtree Accounting Software 2004 then you should again click on “task” available at the top on main menu bar and then select the “Sales/Invoicing” as shown in the following figure.
After you will click on Sales/Invoicing, the following “sales invoice” window will be in front of you.
First of all we will fill the sales invoice with customer id in the customer id field by clicking on magnifier glass as we have already two customers (Shaikh muzamil and Qasim ali) as entered earlier but if we had new customer for whose we had not maintain customer prospects accounts then we should double click on the customer id field then the following page will be in front of you and in this page you will first maintain that new customer prospect accounts as done earlier for old customers (Shaikh muzamil and Qasim ali).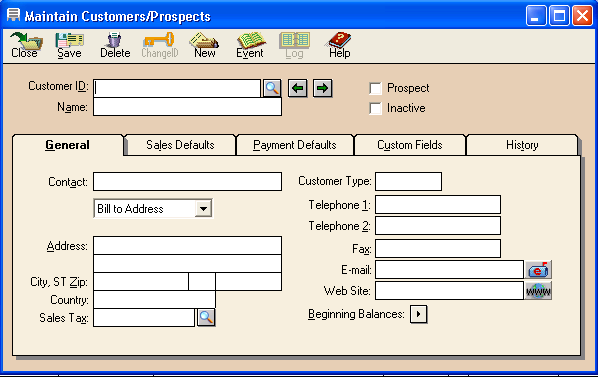
But here we are going to issue the sales invoice to Shaikh Muzamil. For that purpose we are going to click on the magnifier glass as follows:
After selecting our customer sheikh muzamil we will have following “invoice” page in front of us.
As he is our old customer therefore we have his information of customer id and bill to as highlighted in the above figure.
Ship to: This allows you to enter a ship-to address, if different from the bill-to address. You can edit the ship-to address.
Date: Enter the date of the transaction; this date is used for aging.
Invoice No: type the invoice number to record it properly.
Drop ship: It means that the items will be shipped directly to the customer (Shaikh Muzamil) from your vendor (M. Zeeshan Imtiaz).
Customer PO: Type the customer purchase order if any,
Ship Via: You can select the type of method by which the items are to be delivered to the customer.
Ship date: Enter the date when you expect the items to ship.
Terms: here terms means that 5% discount will be allowed to customer (sheikh muzamil) if payment will be made by him within 10 days and no discount if payment will be made after 10 days and the maturity date of payment is after 20 days of delivery.
Note: As we selected the customer to whom sales order has been issued and to whom goods going to be delivered so that’s why we are going to select the “apply to sales tab”.
Item: To display a list of existing items,
Remaining: This is the number of items left to be shipped for the sales order that is applied to this invoice.
Shipped: This is the number of items that you want to ship to the customer and include in this invoice.
Description: You can enter up to 160 characters for the description. Selecting the button displays the full-length description if it is longer than the first line.
Amount: Peachtree calculates the amount by multiplying the quantity by the unit price.
Job Field: If you are tracking job cost, select the job ID (if the job uses them) to which this line item applies. To display a list of existing jobs, click the folder button or type? In this field.
If our company is registered under sales tax act 1990 as manufacturer then we can being the manufacture enter the sales tax if any, and then freight charges.
After that we can save the sales order by clicking on save icon shown at the top of the sales orders or we can also save it by pressing the keys Alt+S.
Note: If you are going to sale not against any sales order then following steps should be considered:
However you can also record direct sale invoice, for this select the date of making sale invoice and enter the sale invoice no. in the sale invoice field. After that Enter the number of units of the first inventory item sold.
At the last, Type in the Item ID of the item of inventory sold. When you select the item id, Peachtree automatically fills the description field.
This can be shown as by the following diagram: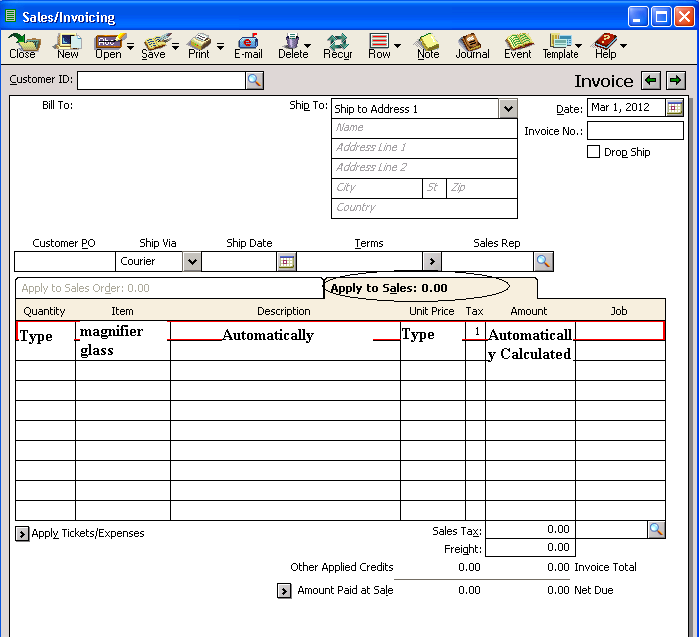
If our company is registered under sales tax act 1990 as manufacturer then we can being the manufacture enter the sales tax if any, and then freight charges.
After that we can save the sales order by clicking on save icon shown at the top of the sales orders or we can also save it by pressing the keys Alt+S.
Receipts
First of all let me clear you about what actually “Receipts” is in simple words, it means it is the written acknowledgement that sum of money has been received.
Now if you want to open the “receipts” in the Peachtree Accounting Software 2004 then you should again click on “task” available at the top on main menu bar and then select the “Receipts” as shown in the following figure.
When you will click on “Receipts” the following screen will be in front of you and from that screen cash account is then selected and then click on “ok” to use the cash account for this transaction, this all is shown through following diagram.
When you will click on “ok” you will get the following window of “Receipts”
Reference: Give the number from the customer's check or method of payment here. You can enter up to 12 alphanumeric characters.
Receipt No: Give the receipt number that corresponds to the receipt number on the preprinted receipt form. Once the first receipt is printed, Peachtree will increase this number by 1.
Customer Id: Give the Customer ID of the customer from whom you received payment. If you leave this box empty, you can only enter a direct sale (apply to receipts).
Date: It means entering the date of the transaction; this date is used for aging.
Receipt Amount: This is calculated by the amounts you apply to invoices or revenues. You cannot enter anything in this field.
Payment Method: From the list, select the method of payment this customer is using. i.e cash or credit.etc.
If Apply to Invoices:
Invoice: Invoices currently unpaid (having an open balance) are listed here.
Due date: The due date for the invoice appears here based on the invoice payment terms.
Amount Due: This identifies the current unpaid balance for the invoice.
Discount: The discount is computed based on the terms for the customer, set up in the Customers/Prospects selection of the Maintain menu.
Amount Paid: (Receipts): Type in the amount you want to pay on this invoice. If you want to pay in full, check the Pay box.
Pay: Check this box to pay the invoice in full. To pay partially, enter the amount in Amount Paid; the Pay check box is then automatically selected.
This can be explained with the help of following diagram: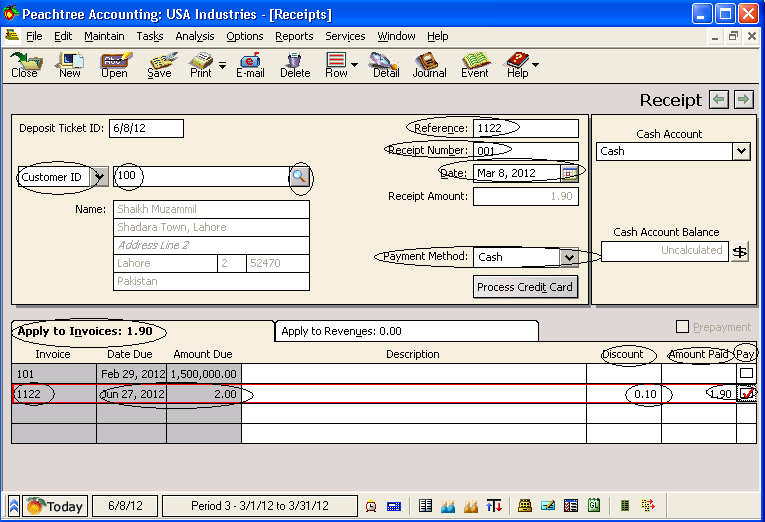
After that we can save the sales order by clicking on save icon shown at the top of the sales orders or we can also save it by pressing the keys Alt+S.
If Apply to revenues:
The following figure helps you that quantity you should type in no of units and item id you can select by using magnifier glass and then description will be automatically be written by the software and after that you will type the per unit cost then the amount will be calculated be the software automatically. This explanation can better be understandable if you will see the following diagram.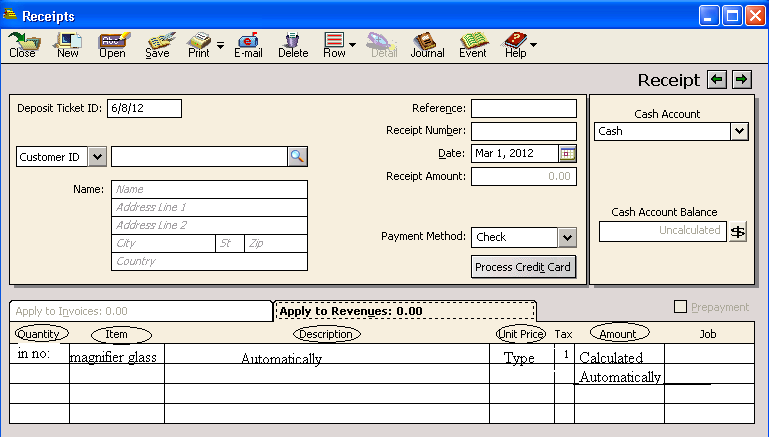
Purchase Orders
First of all let me clear you about what actually “Purchase Orders” is in simple words, it is a commercial document issued by a buyer to a seller, indicating types, quantities, and agreed prices for products or services the seller will provide to the buyer.
Sending a purchase order to a supplier constitutes a legal offer to buy products or services. Acceptance of a purchase order by a seller usually forms a one-off contract between the buyer and seller, so no contract exists until the purchase order is accepted. It is used to control the purchasing of products and services from external suppliers.
Now if you want to open the “Purchase Orders” in the Peachtree Accounting Software 2004 then you should again click on “task” available at the top on main menu bar and then select the “Purchase Orders” as shown in the following figure.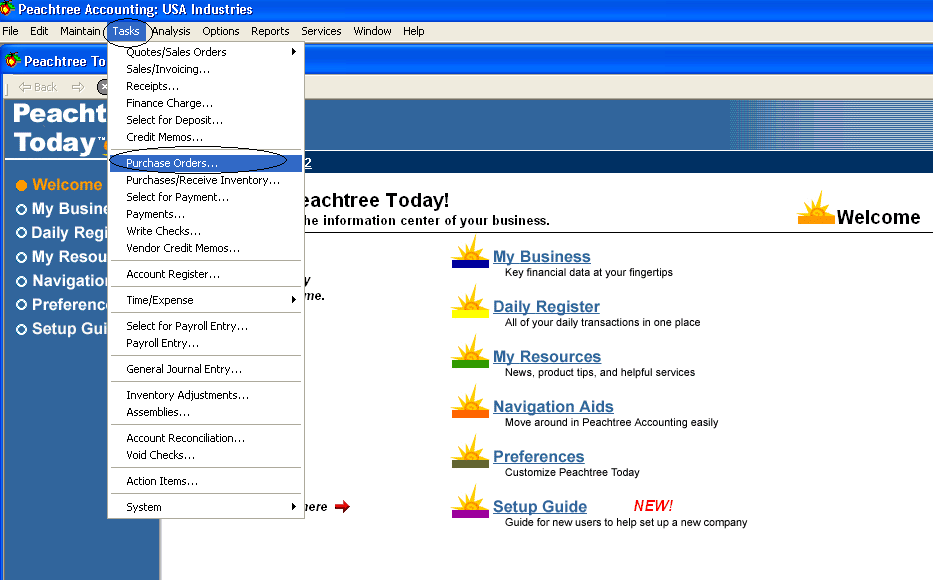
After you will click on Purchase Orders, the following “Purchase Orders” window will be in front of you.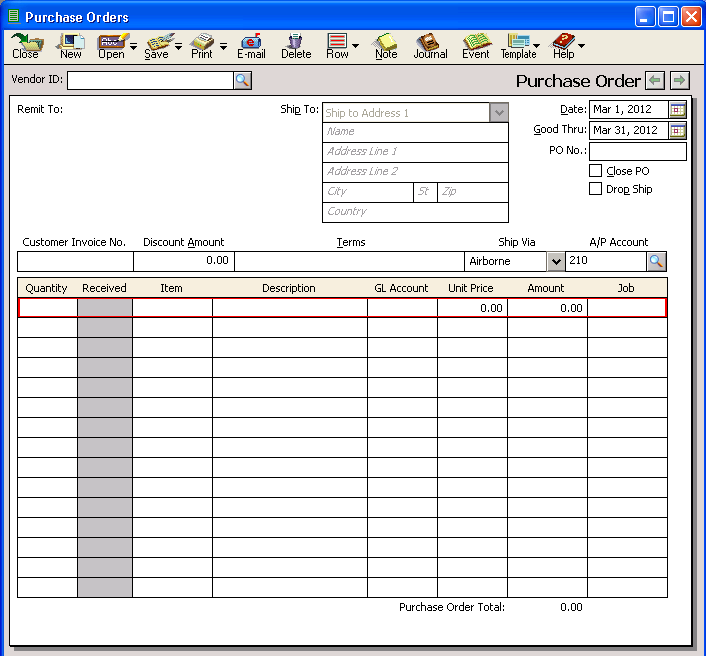
Here first of all we will have to give the account id of the vendors from whom we are going to purchase the inventory (peanut). As we gave the Account id of vendor (M. Zeeshan Imtiaz), Software automatically type the address of vendor, where the purchase order is going to remitted and also the address of that place where the inventory are required. i.e USA industries. After that you will have to enter the date when you are going to make the purchase order. Then you will have to enter the date when the purchase order will be invalid and expire. The most important thing is that you will have to enter the purchase order number.
Drop ship: It means that the items will be shipped directly to the customer (Shaikh Muzamil) from your vendor (M. Zeeshan Imtiaz).
Close Purchase Order: Select this check box to close this purchase order. You will want to do this if you know you won't receive all of the items.
If there is any customer invoice number then give otherwise it’s optional and then Discount amount shows the discount of early payment. Terms with this vendor that if we will pay within 10 days of receiving the inventory then we will avail 2% discount and if we will make payment after 10 days then we will not avail any discount and the maturity date is 30 days from the date of receive of inventory. We are going to receive the inventory via airborne. The account payable id will be automatically written by the software as shown in the following figure.
The quantity in units we will have to enter that we are going to purchase and then the id of the inventory can be selected by clicking on the magnifier glass, after you will select the id of the inventory software will automatically type the description of that inventory and then after that we will have to enter the unit cost, after we enter the unit cost software will automatically calculate the amount of the inventory that we are going to purchase, to make it more understandable this all explanation is shown in the following figure.
After that we can save the Purchase order by clicking on save icon shown at the top of the purchase orders or we can also save it by pressing the keys Alt+S.
Purchase/Receive Inventory
If we want to purchase or receive inventory from any of our vendor (Qasim ali and M. Zeeshan Imtiaz), again we will have to open the Peachtree welcome window and from that window click on the “task” which is available on the main menu bar and then click on the “Purchase/Receive Inventory”. This process can better be understandable if you will see the following figure.After you will click on Purchase/Receive Inventory, you will get the following window of purchase or receive inventory.
In the above window of “Purchase or receive inventory” we can purchase from those vendors who have not open or made any purchase order for this transaction and in this case our purchase of inventory will apply to “Apply to purchases”.
In the above window of “purchase or receive inventory” we can purchase from those vendors who have open purchase order and for that purpose our purchase of that inventory will apply to “Apply to purchase order number”
If apply to Purchases:
If you select a vendor (Qasim Ali) with no open purchase orders, by default Peachtree displays this tab of apply to purchases.
In the above case we are going to purchase inventory from vendor (Qasim Ali) for which there was no any purchase order made and therefore that purchases of inventory will apply to “Apply to Purchases”. In the above diagram case by clicking on the magnifier glass we just select the vendor (Qasim Ali). As we selected the vendor the address of vendor are automatically typed by the software as we recorded at the time of maintaining vendors, and then ship to means the
address where we demand the inventory. Then enter the invoice date from the invoice and then give the number of that invoice. This should come from the vendor's bill. This field is required. Drop ship means that item will be shipped directly to the customer (Shaikh Muzamil) from your vendor (Qasim Ali).
Waiting on Bill means if you do not have an invoice yet, you can select the Waiting on Bill check box. This lets you update your inventory records with the items you have received, but since you don't have a bill from the vendor yet, you can't send payment.
Terms as automatically shown over here as done at the time of maintaining vendors, here 2% discount will be availed by us if we will make payment within 10 days of receiving the inventory but if you will make payment after 10 days then we will not avail any discount from our vendor (Qasim Ali). We are going to receive that inventory via Airborne. The id of Account Payable will automatically be shown by the software as above. Then type the quantity of items in units that we want to purchase. By clicking on the magnifier glass in item we can select the name of item. Then software will automatically type the description of the item and the general ledger account as well. After that we will have to type the unit price and then software will automatically calculate the amount.
If apply to purchase order:
When you select a vendor (M. Zeeshan Imtiaz) who has open purchase orders, Peachtree displays this tab of apply to purchase order number.
Here as we selected the vendor name (M. Zeeshan Imtiaz) this vendor has made purchase order. System will automatically show the option of select the purchase order of that vendor.This can better be understandable if we will see the following diagram: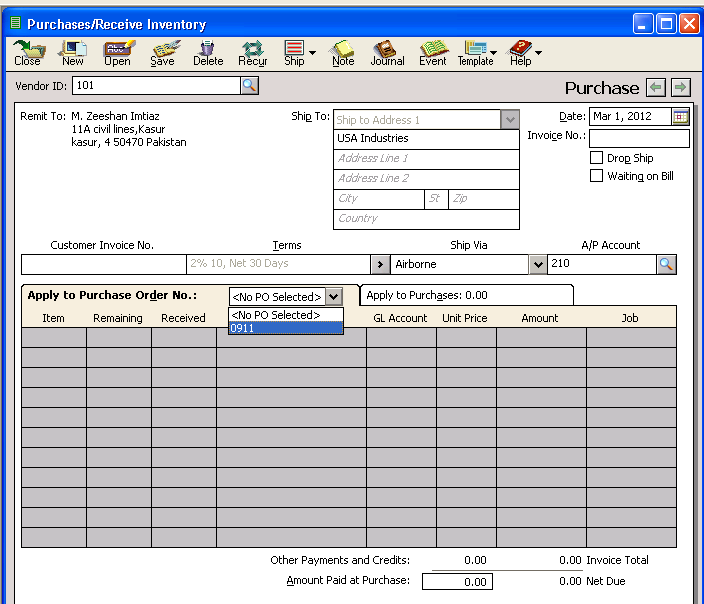

In the above case we are going to purchase inventory from vendor (M. Zeeshan Imtiaz) for which there was purchase order made and therefore that purchases of inventory will apply to “Apply to Purchase Order”. In the above diagram case by clicking on the magnifier glass we just select the vendor (M. Zeeshan Imtiaz). As we selected the vendor the address of vendor are automatically typed by the software as we recorded at the time of maintaining vendors, and then ship to means the address where we demand the inventory. Then enter the invoice date from the invoice and then give the number of that invoice. This should come from the vendor's bill. This field is required. Drop ship means that item will be shipped directly to the customer (Shaikh Muzamil) from your vendor (M. Zeeshan Imtiaz).
Waiting on Bill means if you do not have an invoice yet, you can select the Waiting on Bill check box. This lets you update your inventory records with the items you have received, but since you don't have a bill from the vendor yet, you can't send payment.
Terms as automatically shown over here as done at the time of maintaining vendors, here 2% discount will be availed by us if we will make payment within 10 days of receiving the inventory but if you will make payment after 10 days then we will not avail any discount from our vendor (M. Zeeshan Imtiaz). We are going to receive that inventory via Airborne. The id of Account Payable will automatically be shown by the software as above. We just have to type the quantity of items in units that we want to receive only. Then software will automatically select the name of item, type the description of the item and the general ledger account as well the unit price and calculate the amount.
Payments
It means you are going to pay for the inventory our company purchased from vendors. For this purpose we will have to go the main menu of welcome wizard of Peachtree accounting software then click on the “task” and select the “Payments” option from that. This process can better be understandable if you will see the following diagram.After you will click on the Payments the following small screen will be come in front of you and in that screen we selected the cash account for this transaction and then click on “ok”.
After you will click on “ok” you will get the following window in front of you. That window shows this allows you to write checks for vendor invoices, for payments that don't have a vendor invoice, and for prepayments or discounts. You can also write a check to a customer.
Note the distribution list box at the bottom of the window. The fields of the distribution box differ depending on whether you're applying the payment to invoices or expenses. If a vendor has open invoices, the Apply to Invoices tab will be in front. However, if you are entering a payment to a one-time vendor not in the system, the Apply to Expenses tab is defaulted.
Here in following diagram as we selected the vendor id, software automatically type name of that vendor that we are going to pay on that persons order. As we don’t have any invoice against that inventory therefore we are going to pay and this payment will “apply to expense”. The quantiy in units that we received from vendor must be typed by us and then select the name of that inventory by clicking on the magnifier glass and then software will automatically type the description of that product and then you will have to enter the unit price as well then software will automatically calculate the amount. This process can better be understandable if you will see the following diagram.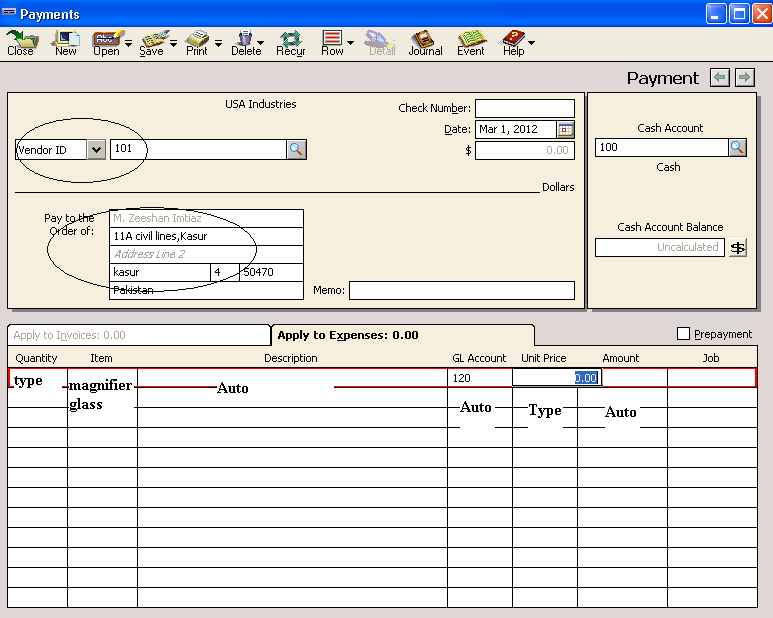
If payment apply to invoices then difference will be that invoice number, due date, and amount due will not be edited and you will have to give description and select the check box if payment if made to that vendor. This can better be understandable if you will see the following diagram.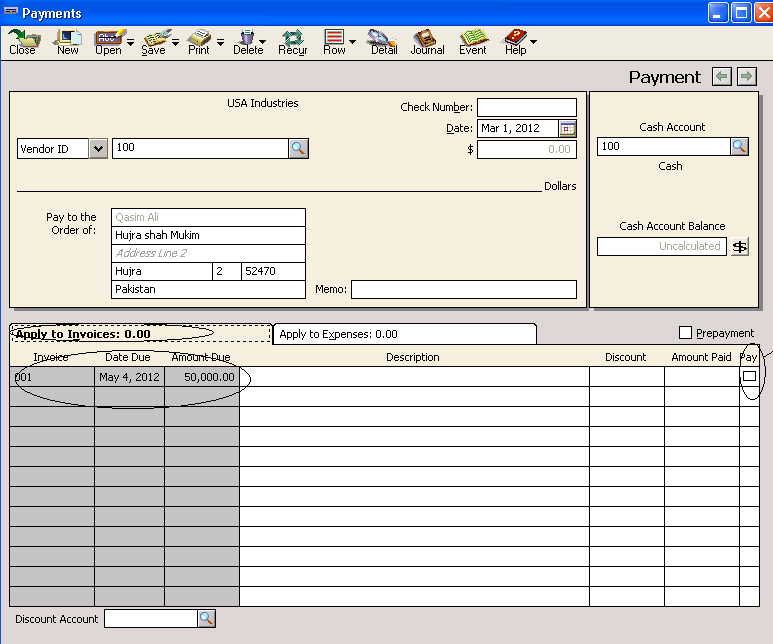
Vendor Credit Memos
Maintain Users
It is as same as the password we gave to the computers to save personal documents from the access of others. Here we are doing this because the new employees of the company can misuse the data of our company can give this data to the other company which is harmful for the company.
So here in Peachtree to make the users id and up to which documents he can have access the documents of our company, we will have to follow the following steps.
First go to the main menu bar of Peachtree and select “maintain” tab which is given at the top of the menu and then select the last option of “users”. This step can be shown as in the following diagram.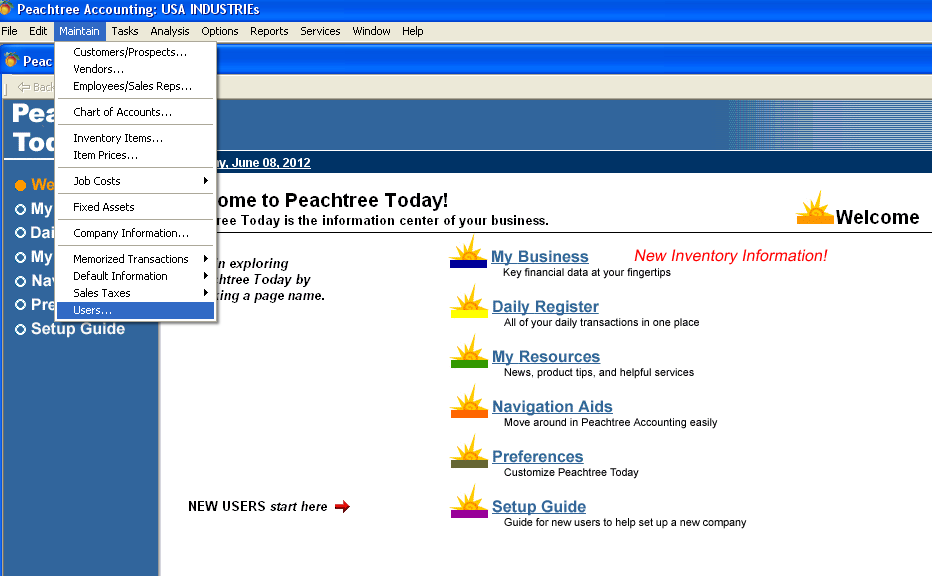
When you will click on the “users” you will get the following small screen before you, you should then click on the “ok” to proceed further.
After clicking on “ok” you will get the following window of “maintain users”. Here first you will have to give the user id and then password of that user id. And then select that in which program area the user will have access or control.
As in the following diagram the user id is “usman asif” and password is “sir bilal sarwar” and you see here that usman asif have no access on system and payroll in summary tab and have access on purchase, sales, general ledger and inventory.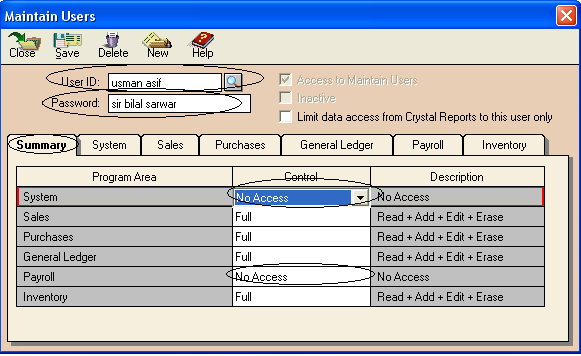
If we will see the other user in the following diagram that user “sir bilal sarwar” and password of that user is “sir bilal sarwar” have full access on system, purchase, sales, general ledger and inventory and payroll in summary tab.
Global Options
You can set certain defaults or preferences that affect our company in the Peachtree data path. You can change any of these options at any time.To do this first you will open the welcome window of Peachtree accounting software then you will have to select the “option” from main menu bar available at the top of the window. Then there will be the “Global” option, just click on it, as shown in the following diagram.
After you click on the “Global” the window of the “Maintain Global Option” will be in front of you as follows.
Here first of all we are going to discuss the first tab that is “Accounting”. You first view of the diagram then I will explain you the first tab of “maintain global options”.
Decimal entry: Here are two following options:
- Automatic: Select this option if you want Peachtree to insert the decimal point. It inserts it before the last two digits of an entered number. For example, if you type 2 and press Enter, Peachtree will display 0.02 in the field.
- Manual: Select this option if you want to type the decimal point yourself. For example, if you type 2 and press Enter, Peachtree will display 2.00 in the field.
Number of Decimal Places: Sets the default number of decimal places Peachtree uses for quantities and unit price fields. You can select from zero to five decimal places; the default is two. For example, if the default is set to two, then entering 1075 will display 10.75. Entering 75 will display 0.75. Entering 1.075 will display 1.08.
Hide General ledger Accounts: You can hide G/L accounts in the following task areas:
- Accounts Receivable: Hides G/L accounts in the Quotes, Sales Orders, Sales/Invoicing, Credit Memos, and Receipts windows.
- Accounts Payable: Hides G/L accounts in the Purchase Orders, Purchases, Vendor Credit Memos, and Payments windows.
- Payroll: Hides G/L accounts in the Payroll Entry window.
In these options you can activate the “Warn if record was changed but not saved” and “Hide inactive Records” and “Recalculate cash balance automatically in Receipts, payments and payroll entry”.
Now by clicking on the second tab “General” you will get the following window before you.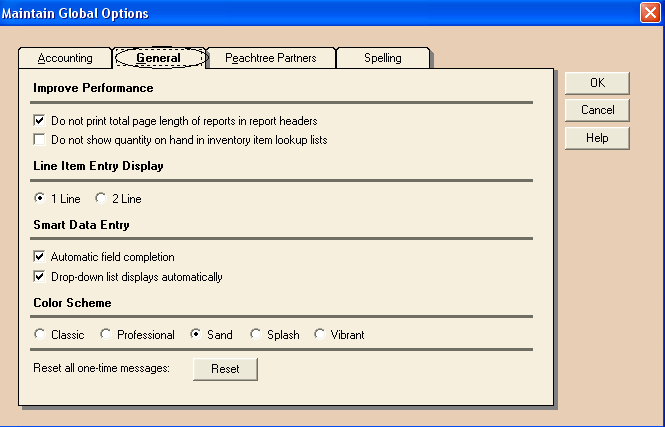
Here in this tab the first thing is improve performance:
It has two important things as follows:
Do not print total page length of reports in report headers: this option allows reports to print faster, skipping the initial calculation of total number of pages prior to printing. Instead of "page 1 of 12" or "page 2 of 12" in the report header, your reports will display "page 1" or "page 2." As done in the computer lab of UCP.
Do not show quantity on hand in inventory item lookups: This option will speed up the display of inventory item lookup lists, skipping the routine of calculating each item's current quantity on hand every time the list is displayed. So I will recommend selecting this option if you maintain a large number of inventory items.
Line Item entry display: To determine whether one or two lines will appear in the list distribution box of various task windows.
Smart Data Entry: This can make data entry faster in most cases by following ways:
- Automatic field completion: Fills in the field with the nearest match to the characters you enter; lets you avoid having to enter all characters.
- Drop-down list displays automatically: When the cursor is placed in the field and at least one character is typed, a list of choices drops down.
Now we are going to discuss the third tab that is “Peachtree Partners”. Actually this tab shows the Security level of Peachtree Partners.
You can set the level of security on Low, Medium, or High. - The Low setting allows all Peachtree Partner applications to run automatically. Peachtree Partner programs will be able to exchange data with your Peachtree database without prompting you.
- With Medium security, when you start a Peachtree Partner application you will receive a warning message that allows you to choose whether or not you want the application to run. This is the default and recommended setting.
- If you choose the High level of security, Peachtree Partner applications will not run.
This explained up can better be understandable if you will see the following diagram.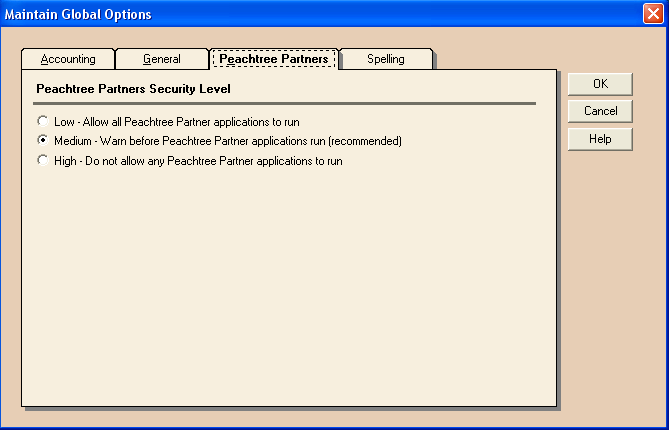
Now we are going to discuss the 4th and last tab that is “Spelling”. In this tab the first thing is that spell check characteristics are available on the following areas.
There are two ways of check spell operates as shown below:
- Check spelling as you type: If you select this option, Spell Check highlights misspelled words in red as you type.
- Check spelling on save or close: When this option is selected, Spell Check automatically reviews your text when you select Save, Close, or Print from windows where Spell Check is available.
Suggestion speed and accuracy: When a misspelled word is detected, a search is automatically made for suggestions. This option controls the speed and accuracy of this automatic search. Pressing the Suggest button in the Check Spelling window causes an increasingly more accurate (but slower) search for suggestions.
Main Dictionary language: This option allows you to set the language of the main dictionary used to check spelling. Choices include American English, British English, and Canadian English.
That’s all explanation can better be understandable if you will see the following figure.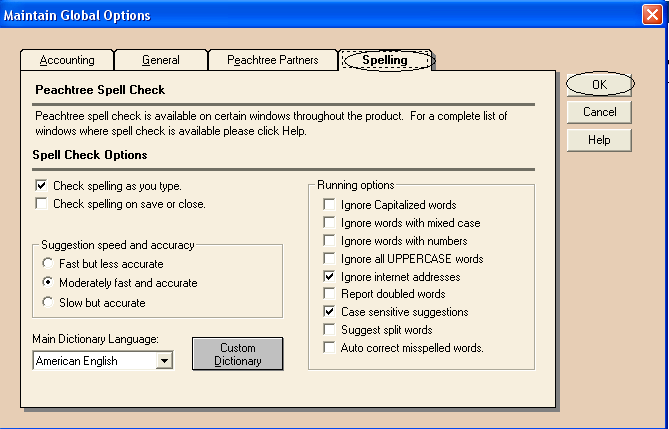
This is the end of our project outlines, I hope that after reading it you will be better be able to explain to others if you want to.